Images and text by Amy Christie for Design Mom.
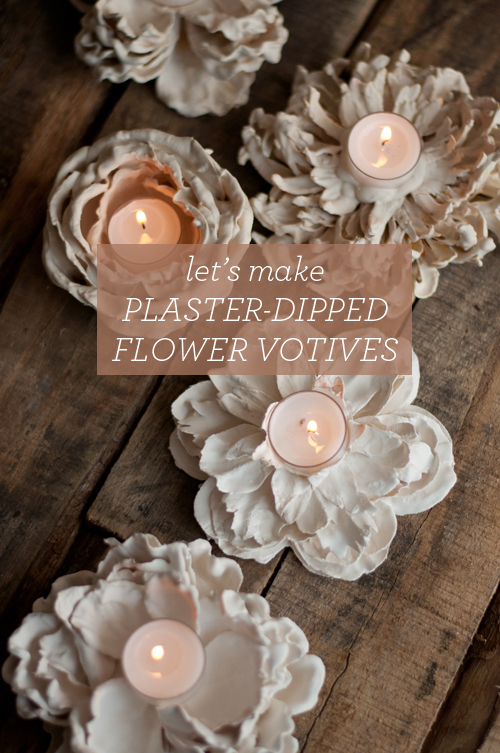
I’ve been loving all the plaster of Paris flowers across the web. They have such an ethereal and dreamlike look to them. Building on the process, I took it a step further and turned the plaster-ed flowers into votives. Dainty and functional.
Plaster is a fun medium to work in. A liquid become a solid in a few short minutes and you get to decide how to form it. For dipping, the plaster coats the petals, freezing them in creamy white loveliness. With the stamina of the plastic flower, the votives appear fragile but aren’t so.
(If you haven’t noticed, I love working with plaster — as seen in these posts: gold leaf votives, leaf napkin rings, quote votives.)
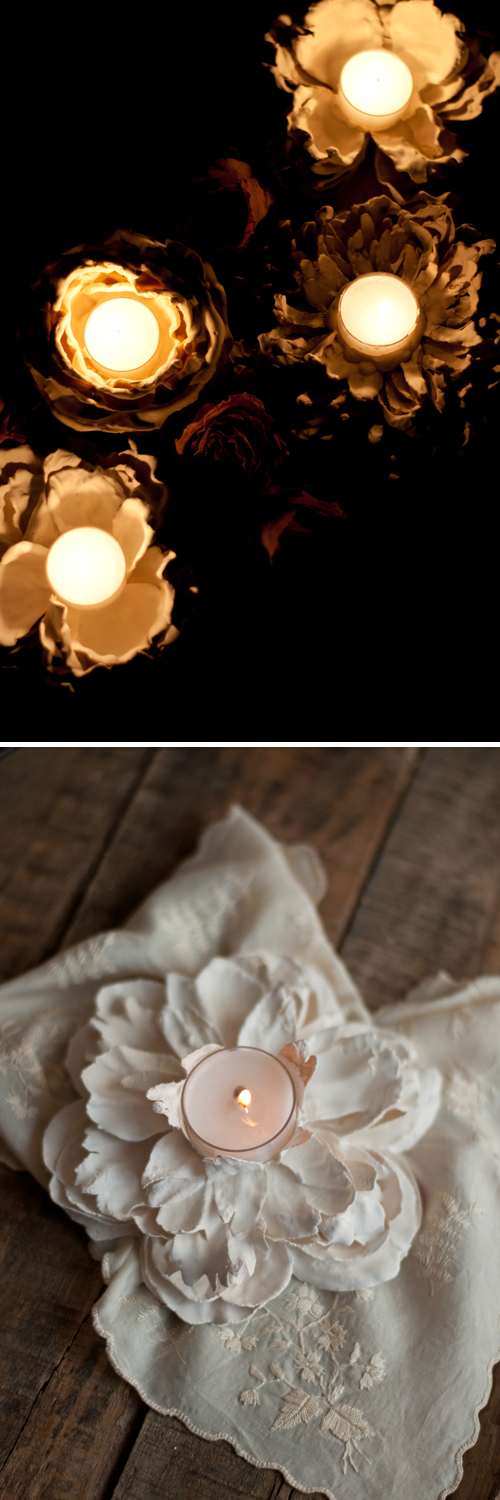
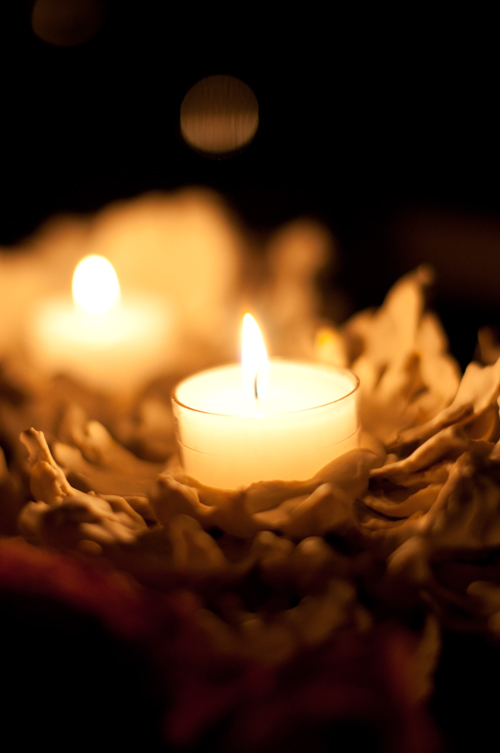
The coated plaster of Paris flowers are still ethereal and dreamlike and now, with the addition of a candle, rather romantic. Gather a few for a shelf in a living room, or on a bedroom mantle.
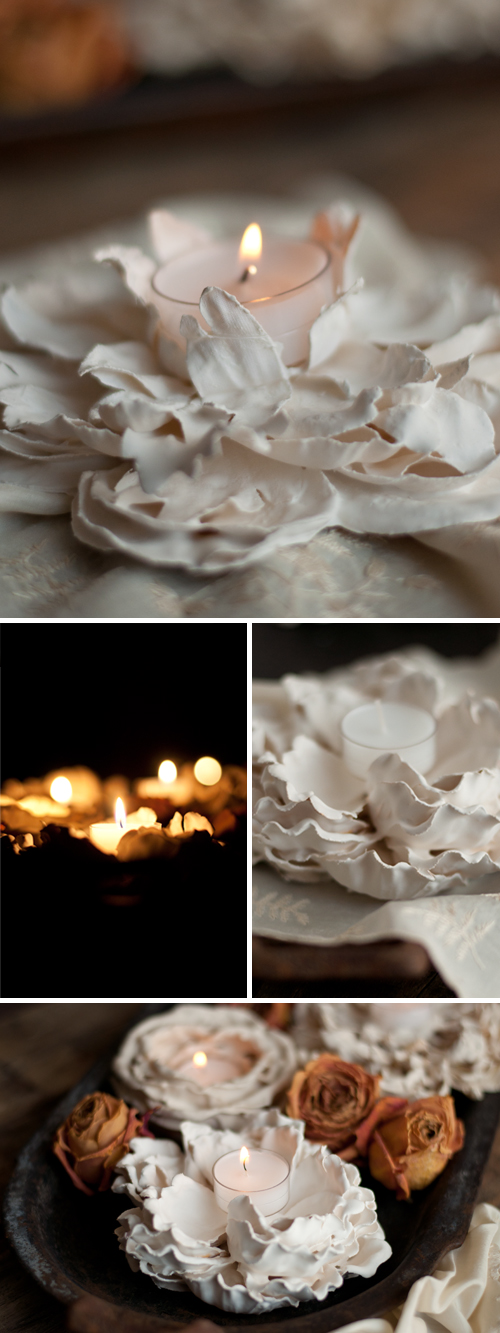
I think a collection of these would make a gorgeous centerpiece for a dinner party — or even as wedding decor!
Ready to get a little bit messy?
DIY PLASTER OF PARIS FLOWERS VOTIVES
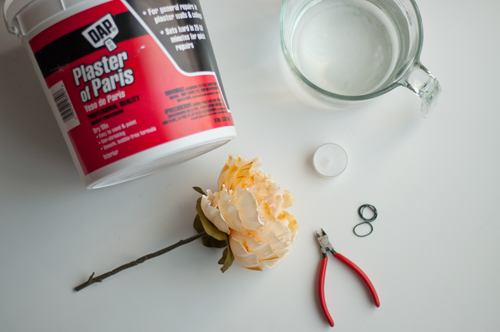
Supplies for your Plaster of Paris Flowers Votives:
-faux flowers
-plaster
-water
-bucket to mix – best shape is something that is more tall than wide
-wax paper or non-porous surface to lay dipped flowers on
-votive for sizing
-small rubber bands
-metal clippers
-small bit of glue – hot glue works great!
-tint* – optional
*You can tint plaster in a variety of ways, all with differing results. One option is to purchase tints made specifically for plaster, found with a simple internet search. I’ve tried food coloring, liquid watercolors and fabric dye powder. I got some color draining and settling with the food coloring and liquid watercolors. For me, the fabric dye gave the most consistent of color with minimal color spotting.
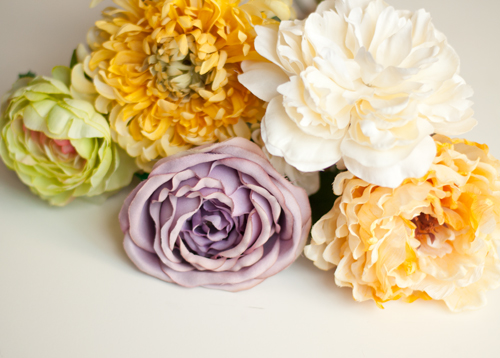
A word on the faux flowers. Just about any kind will do. Some of the stems I chose were the $1.99 variety, a couple were $6.99. Keep in mind that plaster will weigh down and flatten all but the very stiffest of flowers. I got the best results on flowers with larger, stiffer petals. The softer, ‘fragile’ petals just clumped together in the plaster, creating a blob of plaster.
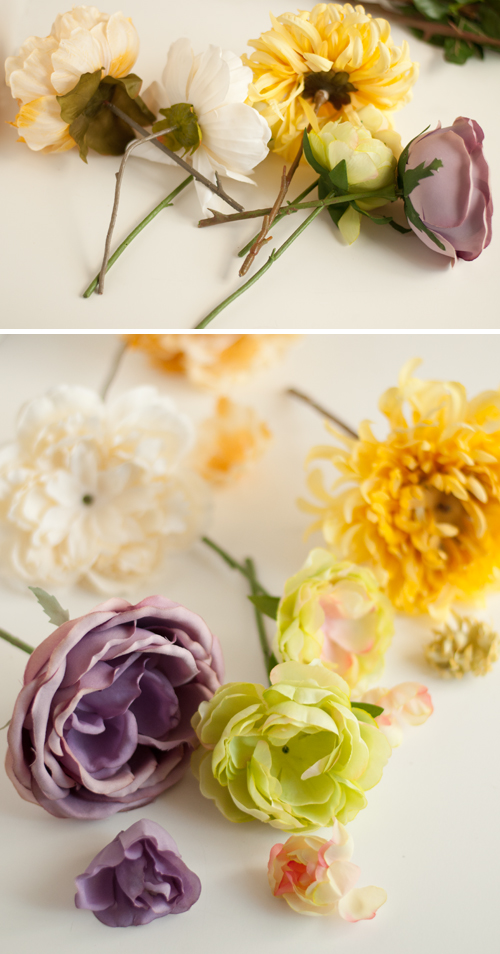
Prep the flowers. Pull the leaves off the stem and pluck out the center (I even cut down the stem. They are so looooong!). The amount that you remove from the center is up to you. To decide, I used a votive to ‘measure’ adequate space.
Most of the time the center is the part that keeps the flower and its petals together. Once you remove the center, add a little glue to keep the pieces together while dipping.
Once the flowers are ready, prep all the plaster items. Because the window of time for useable plaster is rather short, it’s best to get the water, plaster and optional tints set out with all the prepped flowers and then put it all together. Follow the manufacturer’s directions to mix the plaster.
Note: I found it easier and got better results with plaster that had a titch more water than recommended in the package directions. Not a measurable amount more, just a splash or two. It made the plaster more liquidy and it covered the flower better.
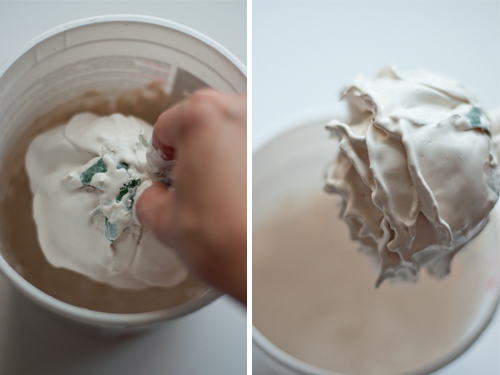
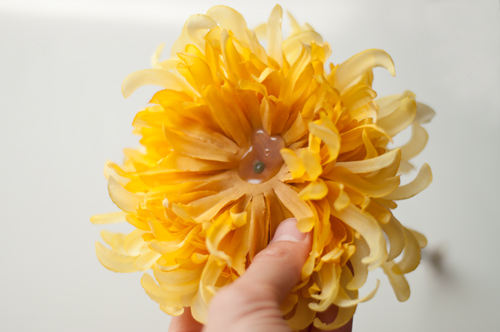
Now for the dipping of your plaster of Paris flowers. Your hands are going to get messy. Immerse the entire head of the flower in the plaster, quickly coating every part. Press the flower in the plaster, turning it often to make sure to get it in the layers, all the way to the center by the stem. Remove the excess plaster by gently but briskly shake the flower head by the stem. Do this inside the dipping container because the plaster will fly everywhere!
After a little shaking, check on the look of flower head. If it needs more plaster in some places or needs a better coat, dip it again. Then shake it. Keep dipping and shaking until you are happy with the look. Again, you will have to move quickly, especially if you are doing more than one flower.
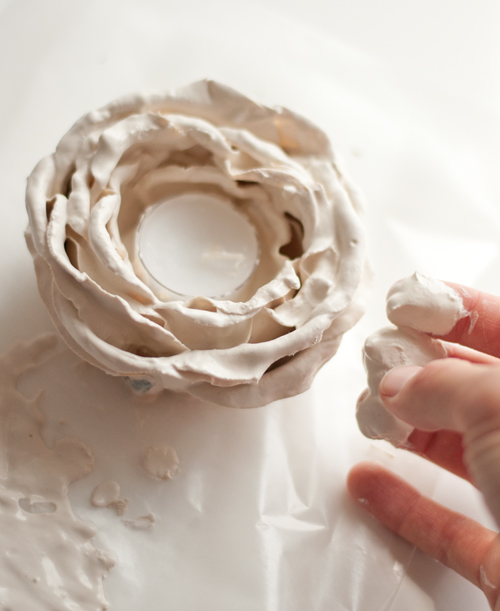
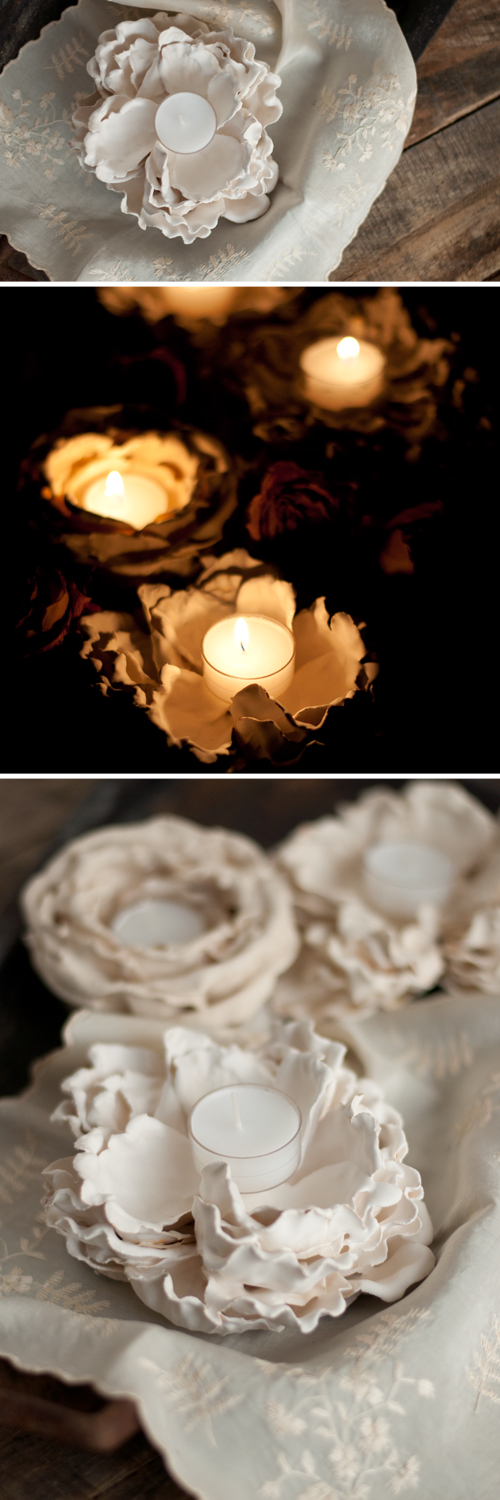
When the flower is finished, pluck or cut the flower head from its stem. Place it with the petals up to get a flat base. I added the votive right then to make sure there was adequate space for it before the flower set. If you find parts not covered in plaster or clumps, use your fingers to either apply or remove plaster.
I used small rubber bands to sculpt the petals on a few flowers.
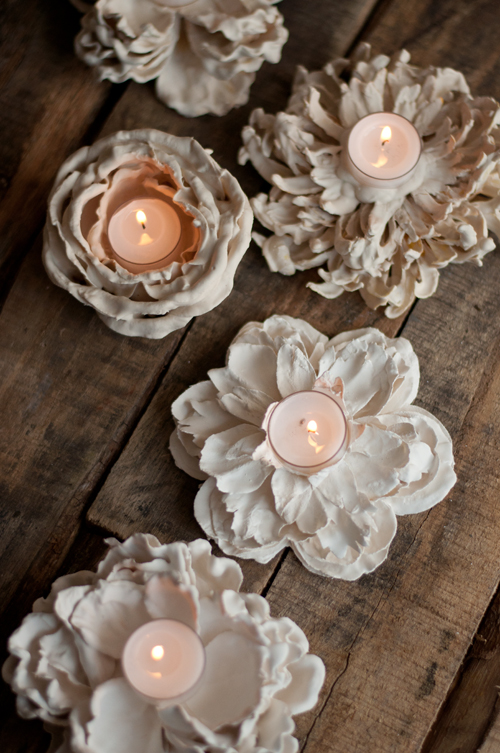
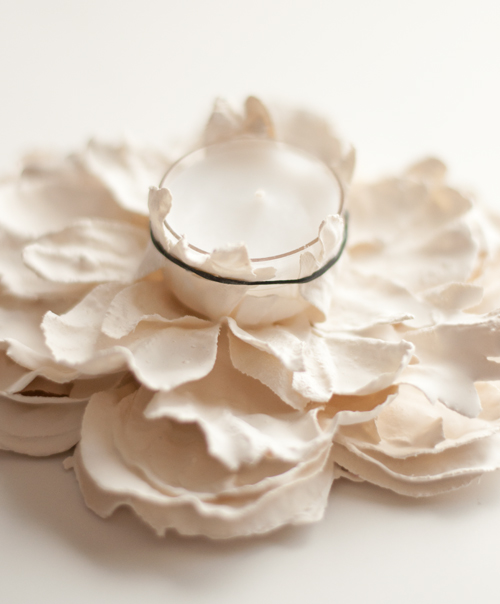
Allow your plaster of Paris flowers votives to fully dry and then add a lit votive candle.
Gorgeous!
P.S. — Like to make things? Click here for lots of fantastic projects.
These are stunning, what dye color did you use? I love the subtleness of color, very vintage looking.
Pingback: {Friday DIY} Plaster Dipped Flower Votives | Greenville, South Carolina
Is there anyway I can purchase these?
Pingback: In which I got totally plastered | let's just call it whimsy
Pingback: Better off Pinned | let's just call it whimsy
Pingback: Great Craft Ideas - June 2014 - Crafts by Amanda
Pingback: A Few of My Favorite Pins | ConfettiStyle
Pingback: DIY suport de lumanari | Onlyfashionthings's Blog
Pingback: 13 Incredibly Gorgeous Ways To Set A Relaxing Mood With Candles
These are gorgeous, I’m excited to try them. I’ve had great success with Mod Podge and smaller silk flowers, making pushpins and magnets from them but this looks better for the larger flowers and stronger as well. Great info, thanks!
Pingback: DIY Projects That Don’t Require Martha–Or A Blowtorch | Urban Scrawl
I really love this idea! Thanks so much for posting.
You could also set them in a shallow bowl to make them curve up – or drape face down on an upside down bowl.
Hi Wendy,
I was going to ask the question about turning the flower upside down and if that would help keep the petals upright. Your suggestions were great!
The only thing I can see with the shallow bowl is it would have to have a flat bottom or the flower wouldn’t sit straight on a table or wherever.
As for turning upside down, how would you do this? The flower would have to be not touching anything. I was thinking when you make taper candles you hang or tie the wick cord over a pencil or whatever. It pays to talk or “write” things out.
Instead of shortening the stems of the flowers keep a decent length of stem and when ready to hang wrap the stem around the pencil or whatever. Again, we’d have to make sure the plastic cup of the tealight would still fit. AND, again again, need to have the bottom of the flower flat and hanging it upside down wouldn’t work for that.
Well, darn, talked myself out of that pretty quickly. Maybe your idea of the bowl is the best thought.
Thanks for sharing.
I saw a project on Sabrina Soto’s show on HGTV where she used paper tape to put plaster flowers on a chandelier and then spray painted the whole thing. I could never find a tutorial for that, so this is awesome!
What do you mean by ‘I used small rubber bands to sculpt the petals on a few flowers’???
Oh wow! Those candle holders are so pretty! I think I have to try this once, too :)
Thanks for inspiration!
Veery energetic article, I liked that a lot. Will thedre be a part 2?
Pingback: Live the Peace
Pingback: Spring Feng Shui Home DIY Projects | Feng Shui Interior Design | The Tao of Dana
Pingback: 34 DIY Projects You Need To Make in Spring | www.FabArtDIY.com
Your candle holders are gorgeous and very delicate!
I tried to follow your tutorial at home. I could say, that I like my result, but just wanted to check whether you have cracks on your candle holders? I left the flower to dry about 3 hours. But when I took it, I saw some cracks, as well as some very small parts of the plaster fell into my hands.
I followed the manufacturer’s directions to mix the plaster. I also followed all the steps to prepare the candle holders.
There is also one small problem: I bought a white plaster and the flower I used was also white. But the color of the candle turned pastel-yellow. What do you think of the color? Why it turned a little bit pastel-yellow?
Thank you very much beforehand for your reply!
Regards,
Milena
Pingback: 60 Floral Projects
you inspired me to make my own wreaths using these gorgeous flowers! Let me know what you think :)
https://www.etsy.com/listing/196193740/front-door-wreath-to-impress-your-guests?ref=pr_shop
These are so pretty! One of the other commenters commented they looked vintage-y and she’s right.
I’ve seen liquid porcelain in Michaels. Have you tried it?
What about putting even more water in and dipping more than once? Not really sure that would make a difference.
Just something to think about: most tealights are a standard size (not always but mostly always). Once you’ve finished the dipping you could put the plastic cup in right away and then can keep changing out the tealight without disturbing the petals. Give it a little wiggle room, though, as the cups can get old looking and you might want to change them out at some stage.
Can’t wait to see more of your experimenting.
All the best,
Cathy
I’m planning on making these for my wedding! What dye did you use for these? Pink? Tan?
Is the plaster safe to be used around an open flame?
These sare amazing…what color did you use for these…really stunning!!!
This is such a great looking project! I tried it this day together with my mom. We had five flowers, but only two daisys went well. The other three were unfortunately a total mess. With how many flowers did you start and how many went well?
I think I’ll try it one day again but for today it’s enough ;)
Yours Kathleen
LOVE this!! I would love to make these for Christmas gifts for my friends at my office! I have an idea to tint the plaster…if it works, I’ll let you know!
Vickie
Surf, pin, create
PS
We live in a house we call our Treehouse too (in Auburn, Alabama)
I LOVE this idea for my wedding – I also want to have flowers floating in water in tall vases – do you think the plaster would come off if I also put them in water?
Incredibly it done – I’m in love!
This project was a total fail. I’m so bummed. I could not get the flowers covered with the plaster so the silk flowers ended up being very visible. Also, the plaster was drying and crumbling as I was trying to shape the center with a tealight. What a waste of time, money and materials :(
It’s actually a great and useful piece of information. I’m happy that you shared this useful info with
us. Please keep us up to date like this. Thanks for sharing.
I made these this afternoon and they turned out lovely! I did a trial to see how they would come out — so happy with the results. Thinking about spray painting some of them gold to match the décor for my wedding. Thank you for the idea and the tutorial!
Like to learn more plaster of Paris ideas
Love it
Hello~
I really love the ideas and I tried to make one today!
But turned out its really hard to achieve such a smooth effect!
And the plaster of paris turn into solid very quickly!
I wonder how is the rescale of water and plaster should be to achieve your effect?
Thank you and keep sharing your wonderful crafting idea!:)
What size flowers heads work best to fit the tea light in the middle? I’d like to give these a try. What size flowers has everyone used?
These are gorgeous, as are your photos! I am so excited to have a chance to try these, but must get more flowers first! Am I right in thinking that these were done with silk/fabric flowers? I know there are very few plastic flowers available now, but would plastic be a good material to use even if found? (Perhaps they cannot be “manipulated” enough to shape … even though you said stiff petals are better?!?)
Thanks for sharing these beautiful creations!
Pingback: DIY Candle Holder Decorations | Ecotek
Pingback: Ideas para decorar todo un jardín con muebles reciclados
Pingback: Diy Plaster Dipped Flower Votives | Good Ideas For You
Pingback: 37 Stunning DIY Candle Holders To Try | Candle Junkies
When do you use the color? Do you mix the powder dye into the plaster?
Pingback: 33 Best DIY Wedding Centerpieces You Can Make On A Budget – DIY Crafted
Just love the Flowers! can’t wait to try it out…
Pingback: This Dollar Store flower decorating technique is going viral (7+ projects) - DIY
Not sure what you guys mean by “using rubber bands to sculpt the petals” Am anxious to try this. My niece thinks it would be too heavy to work with. Any comments?
What happens when the candle burns down?
Pingback: 15+ Ideas For Making Flowers - A Little Craft In Your Day