By Gabrielle.
My friend, Anne Weil of Flax & Twine, just came out with a new book that I can’t wait to tell you about! It’s called Knitting Without Needles. If you’ve ever wanted to try knitting but feel a bit intimidated, then this book is for you. Because it’s made for Non-Knitters and Knitters alike! The projects are totally doable, and because so many of them use big yarns, they make a big impact.
When you’re thinking about making gifts for the holidays, this book is a fantastic resource for easy and quick projects. And Knitting Without Needles is a great way to bring chunky knits (which are all the rage!) into your home without the big price tag.

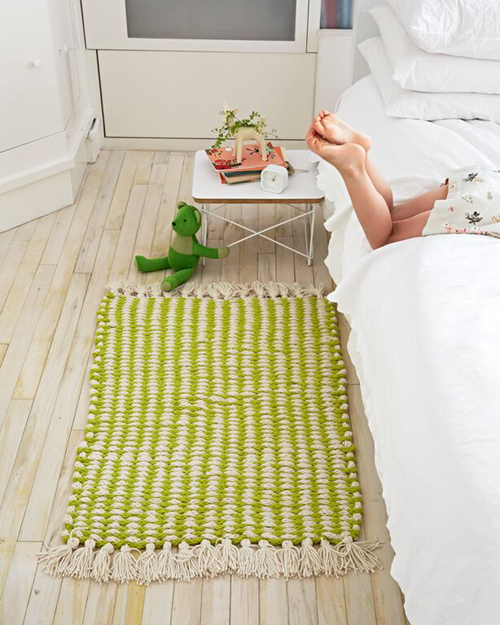
The book is filled with tons of cool projects, including this happy throw rug and these chunky pillows:

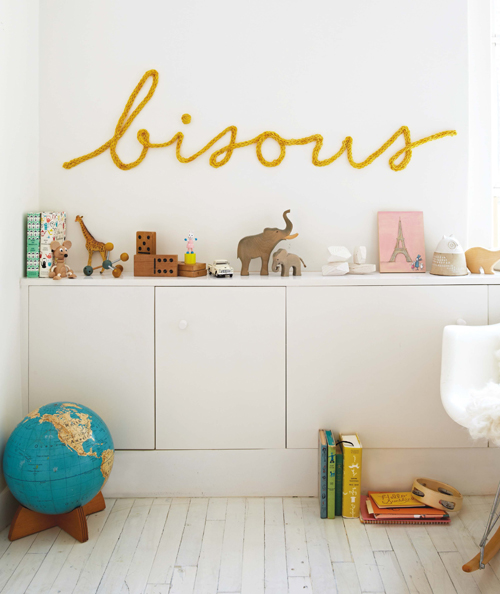
I’m feeling like a lucky duck today, because I get to share instructions for one of the projects from the book with you! You can make the fantastic Wired Word shown at the top of this post! I think it would be so cute in a nursery or a reading nook. Bisous means kisses in French, but you can write anything you like. Any word, any color, any script. The possibilities are endless!

Materials & Tools
– 120 yd (109.5m) of worsted-weight yarn
– 7 yd (6.4m) of 24-gauge florist wire in a color to match the yarn as closely as possible
– Masking tape
– 1⁄2″ (13mm) flat-head brass nails, tacks, or removable foam adhesive strips
– Wire cutter
– Level
– Hammer
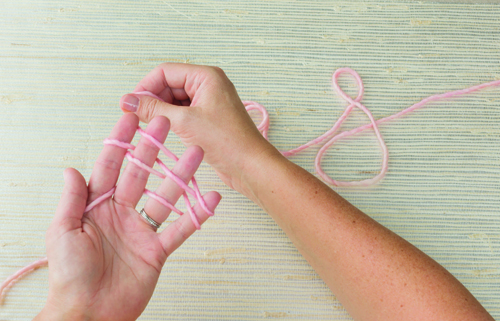
1) Finger knit a four-finger strand until it measures approximately 6 yd (5.5m) or until it’s long enough for your desired word. (Don’t know how to finger knit? Find full instructions in this pdf from the book.)
Tip: Specified length is enough for a 13½” (34.5cm) tall bisous, which includes the height of the b. The shorter letters are approximately 6″ (15cm) tall. If you want to change the dimensions of the word, simply knit less or more. Test the length by spelling out your word as you go.
2) Bind off strand. When in doubt, finger knit a longer strand that you can trim later.
3) Make a threading loop in the wire by folding 1″ (2.5cm) of the wire end over and twisting the top (A). This rounded shape will move more easily through the loops of the finger knitting.
4) Uncurl the tube of the finger-knitted strand, exposing the purl side of the finger knitting. Thread the wire underneath a purl stitch in the center of your strand in each row (B). Continue to thread the wire consistently through the same loop of each row for the entire length of finger knitting. (Be sure to thread through each row; the more rows you miss, the less consistent your line for lettering will be later.) It’s okay if the strand gets slightly bunched up or twisted on the wire; it will stretch it out later.
5) When you’ve threaded the entire fingerknit strand, leave the wire uncut so the strand can move up and down along it as you form the word. If the wire is not on a spool, fold it such that it won’t slip out of the finger knitting as you move the strand around.
6) Print out your word in large scale at a local print shop and trace the wire against the word exactly as you go (C). The Bisous is 131⁄2″ x 48″ (34.5cm x 122cm), using the font Quickpen by Trial by Cupcakes. (You can draw the script freehand if you prefer.)
7) Start following the text letters with the wired strand (C). Tape it in the critical turning points and crossover points as you go (D). This gives you a good sense of where things should be secured later. As you turn the strand to form the letters, keep the finger knitting straight and untwist it as you go. You want the finger knitting to lie as flat and unstretched as possible.
Tip: As the wire bends, sometimes you get an elbow of wire sticking out. In this case, soften the bend and pull the strands of finger knitting out to cover the wire.
8) Create any dots in letters, as in a lowercase i or j, by winding a small amount of yarn into a ball.
9) When you get to the end of your word, if the strand of finger knitting is too long, you can cut it and rebind it off at the appropriate length. If, for some reason, the strand is too short, adjust the letter size so that the finger-knitting strand can form all the letters required. Weave in all ends.
10) Cut the wire 1″ (2.5cm) or so past the end of the word. Feed the tip of the wire through the end of the strand, turn it back and twist it around itself (E), and bury the wire into the strand of finger knitting.
11) To hang the word, gently undo the tape from the paper. At the crossover points, use the tape to wrap around and secure the junctions for now. Set aside the finger-knit word, maintaining its form.
12) Tape the printed word to the wall where you want to hang it, level it, and hammer small flat-head brass nails into the wall in all the places needed to support the word. The nails should stick out enough to catch the wire and strand. Places to secure it include all the tops of letters and loops. Carefully remove the paper, leaving the nails intact. You may have to tear the paper.
13) Ask for help to carefully hang the word, securing the wire behind the nail heads in all the critical spots. Remove the temporary tape from the crossover points and replace with small pieces of wire or additional nails or tacks as needed. Secure the beginning and end of the word with nails or tacks as well.
Tip: If the thought of all these nail holes makes you squeamish, try using small pieces of 3M double-sided removable foam tape or Command strips. Instead of nails, use a pencil to poke through the paper and mark the critical support spots on the wall. Place small pieces of the tape on the corresponding locations on the knitted strand. Remove the backing and secure to the wall. This method may not last as long, but you’ll end up with fewer wall holes.
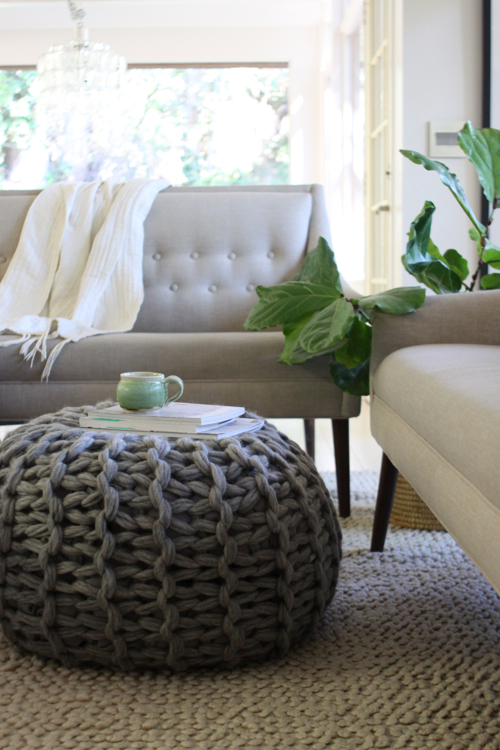
As one more proof of the awesomeness of this book, I want to show you the floor pouf Anne made me! It’s completely adorable, and it’s so soft that it instantly became little June’s favorite spot for reading. I shot a couple of photos of it in our living room the other day. Isn’t it fantastic? What a sweet gift! Thank you, Anne!

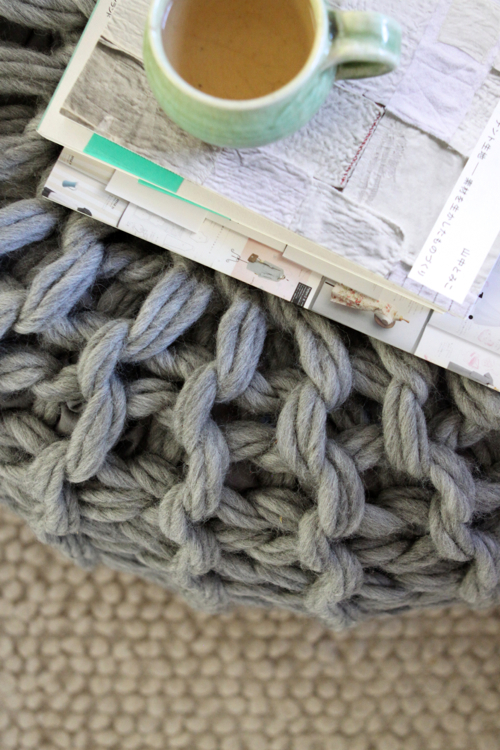
By the way, if you want to try any of the projects in the Knitting Without Needles, you’ll want a good yarn source. The book’s yarn was sponsored by Purl Soho, and the fabulous floor pouf that Anne made for me uses Cascade Magnum yarn. Oh! And I wanted to tell you, that kits for the poufs or signed copies of Knitting Without Needles can be purchased at Anne’s shop.
Happy making!
that sounds really great! that ‘s some coool projects to do with my 10-year-old daughter! can’t wait.
Can you tell me where to find Annie’s store and the kits to make the poufs? I was able to find the kits. Thanks!
Wow, projects of this book looks great for creative cosy autumn evenings. I didn’t knew finger knitting but I have a big ball of jersey yarn awaiting for a projects since months ( ok, years in fact ). Let’s try it !
One of my daughters has made quite a few scarves using arm knitting. I can’t wait to share this with her to see all the other things she can make. And I hope to be the recipient of a few of them!
I love that lettering on the wall!
Paige
http://thehappyflammily.com
So genius. Can’t wait to try this… I’ve always enjoyed knitting these “ropes” and had no clue what to do with them– problem solved!
The floor pouf is gorgeous and the projects in the book look so pretty. I need to get this!
Pingback: 15 Easy and Fun Finger Knitting Projects – Cool DIYs