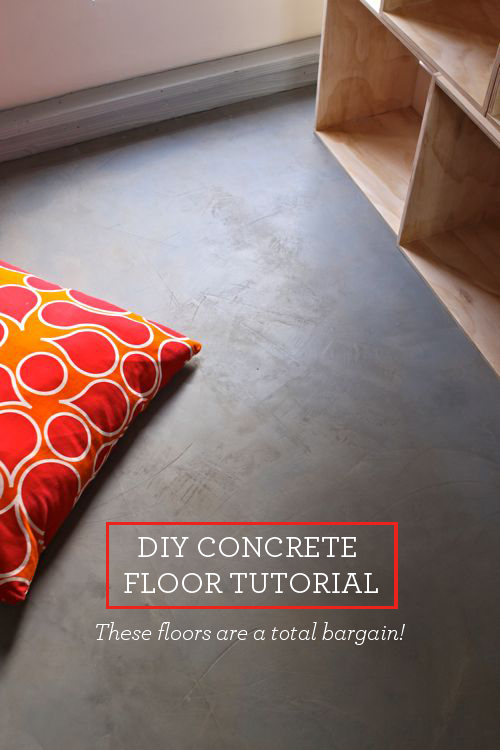
I’m pleased as punch to tell you about the DIY concrete floor experiment that we tried in the reading loft of The Treehouse. I love how it turned out! The texture is wonderful. The floor looks layered and feels like it has depth — but the whole surface is barely 1/8″ deep! It’s easy to clean and maintain. It has the industrial look I am every drawn to. Plus, it was inexpensive and totally DIY-doable.
I originally thought we would put carpet in the loft, but then I changed my mind and thought I would rather install a sweepable surface with an area rug on top. I made some inquiries about concrete floors and was told the weight of true concrete would be too heavy for this area, so I shifted my attention to tiles. But about that time, I read a blog post about resurfacing a laundry room counter with a thin layer of concrete and I wondered if I could try the same method on the reading loft floor to achieve a concrete look without the heavy weight.
I finally concluded: why not try? The space is small and a low-traffic area. The materials are a bargain, so if it failed it wasn’t too great of a loss. Plus, if our DIY concrete floor was a disaster, I could cover it with tile or hardwood and hide the evidence. So I gathered the materials and went for it!
Would you like to see how this DIY concrete floor came together?
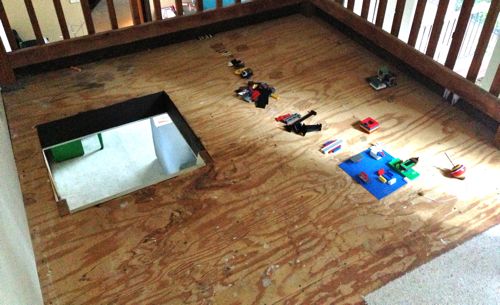
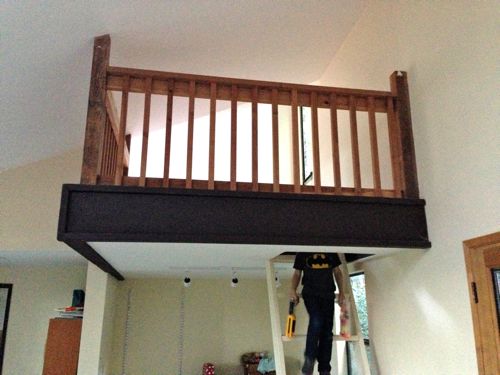
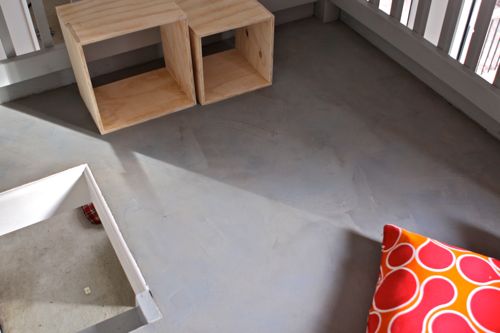
Let’s start with a few before shots. As you can see, the loft is a small raised area above the family room. The whole area is about 7 x 10 feet, and can be accessed by a ladder. The floor was unfinished — a simple plywood subfloor ready for carpet, tile, hardwood, or in our case: concrete!
DIY CONCRETE FLOOR – MATERIALS NEEDED
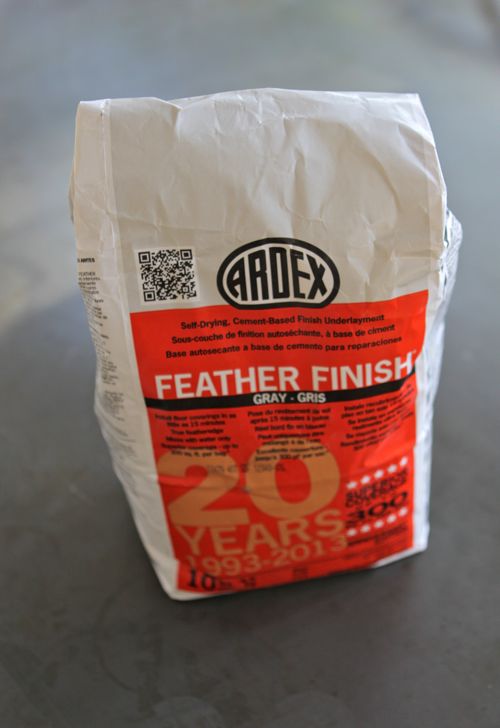
Next, let’s talk materials. The magic ingredient is Ardex Feather Finish. This stuff is simply a delight to work with! You can apply it in thin, thin, layers and then build it up to a beautiful finish.
It used to be hard to find, but now it’s available online!
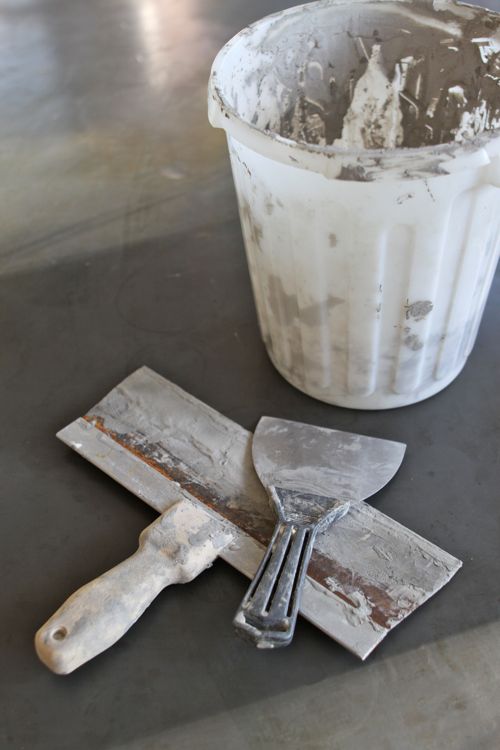
You’ll also need a trowel or spreader — I liked using a couple of different sizes — plus an old bucket and spoon for mixing the Feather Finish.
DIY CONCRETE FLOOR – STEP BY STEP
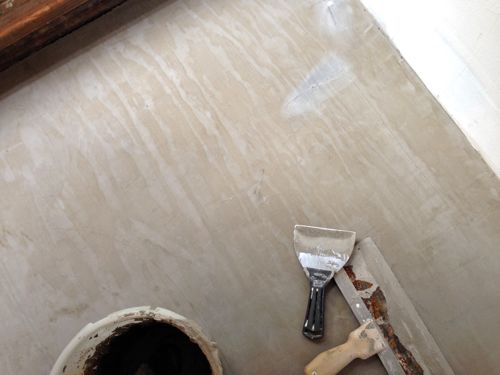
Once I had the appropriate supplies, I reviewed directions for a DIY concrete floor found here and here. Essentially, you pour some Ardex Feather Finish (it’s a powder) into your bucket and add some water, then stir. You’re going for the texture of a thin pancake batter. I never measured the Feather Finish or the water. I would just add a little of each till the texture was right. I also worked in small batches — because this stuff dries really fast!
After it’s mixed, I let it sit for 1 minute in the bucket to achieve a sort of “soft set”, then I would pour it out onto the floor and use the trowel to spread it. The first layer went directly on the plywood. (I swept and dusted it really well beforehand.)
I worked in very thin layers for our DIY concrete floor. In fact, I could see the plywood through the concrete for the first few layers. I was working on this late at night, so I would do a layer, then head to bed and then let it dry over night. Which means the project dragged out for days! But the layers actually dry quite quickly, so you could truly tackle this on Saturday and finish the whole thing.
Before I added each new layer, I would take a putty knife and scrape off any bits of dried concrete that were protruding too much, and I would give the entire floor a very light sanding. Then I would sweep up the dust and add another layer of Feather Finish.
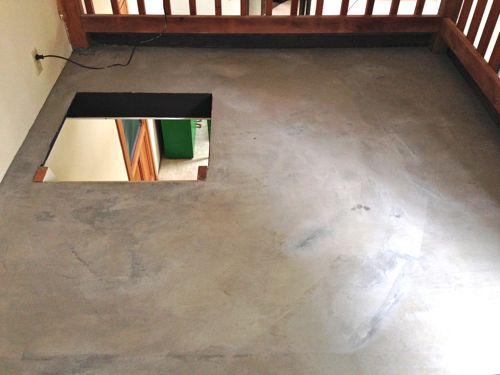
Ultimately, I built up 6 thin layers and then topped it with a thicker layer. But the whole DIY concrete floor is quite thin — maybe 1/8″ thick max.
DIY CONCRETE FLOOR – THINGS TO KNOW
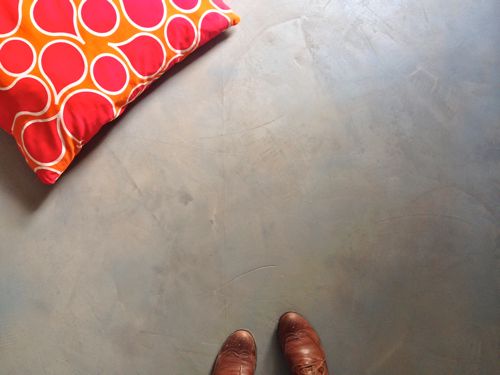
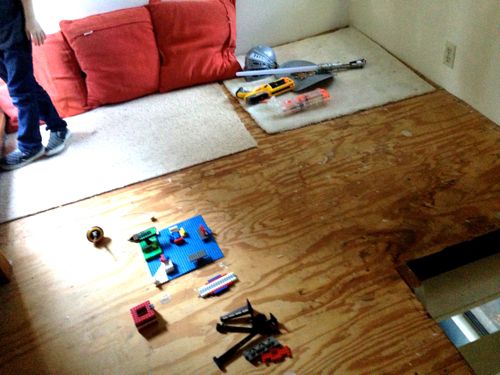
One thing I learned: You can still see the seams of the subfloor (notice the vertical line on the right hand side of the photo above). In the case of the loft floor, having seams showing is fine with me because I knew it was an experiment and I had low expectations — plus, I’ll be adding an area rug which will cover the major seam anyway.
But if I were doing it again, I would put down a layer of burlap cloth first. Apparently, applying the concrete over the burlap will hide the subfloor seams and prevent cracking. (I learned that little tip the day the floor was finished — I haven’t tried it yet, but I’m dying to!)
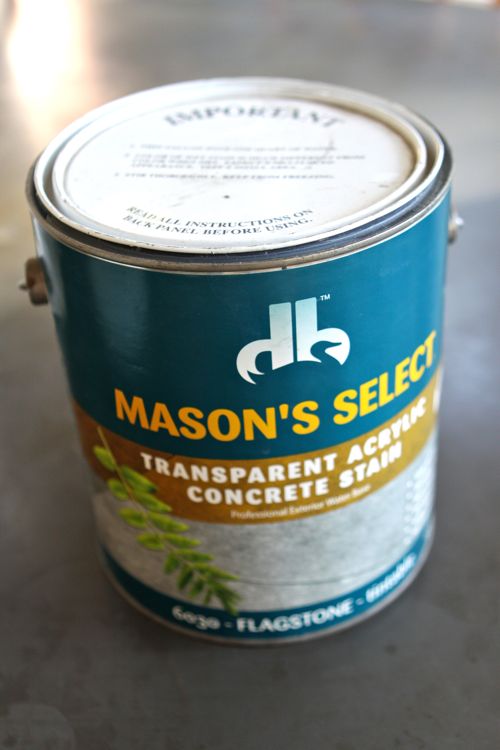
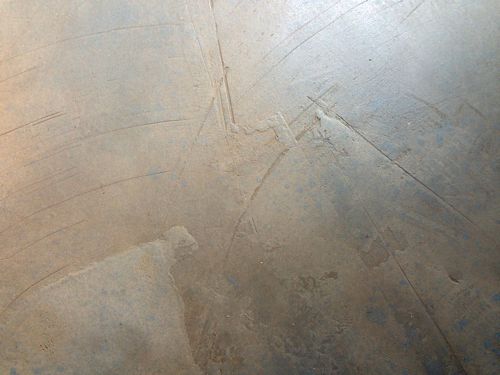
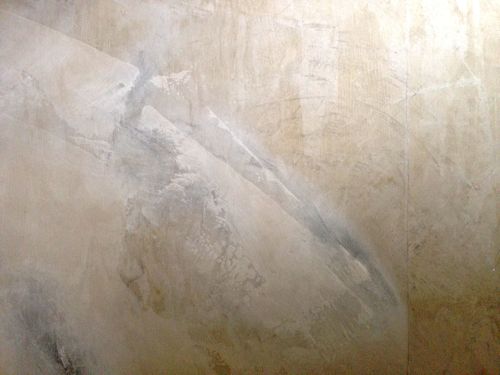
At this point, I departed from the tutorials I linked to above and tried concrete stain, instead of the recommended sealant. This was a tip from sculptor who has worked with concrete before and knew this would add depth. And it totally did.
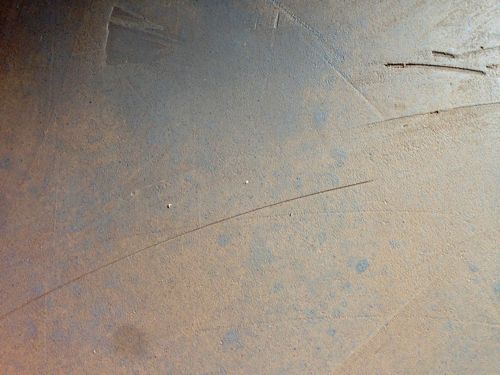
The stain definitely created depth and also left bluish areas that look really cool! I really like how the stain affected the overall look.
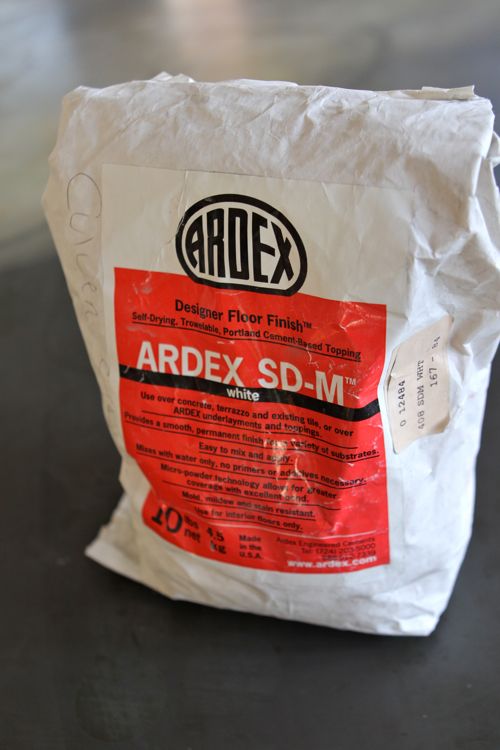
One other thing I learned: In addition to the Ardex Feather Finish, I also bought a bag of Ardex SD-M. The Feather Finish only comes in gray, but the SD-M comes in either gray or white. I chose white. I’d read that you can add a layer of SD-M on top of the Feather Finish if you want a whitish floor instead of a gray one — and that you can even tint or dye the SD-M if you want colored concrete.
Since the floors downstairs were white-washed, I thought it might cool to keep the concrete white as well. So for layer number 5, I used SD-M instead of Feather Finish. Turns out, I didn’t like the look of the white at all! I much preferred the gray. And it might have been my imagination, but I felt like the SD-M wasn’t as easy to work with as the Feather Finish. Anyway, for layer 6, plus the finish layer, I went back to using Feather Finish.
And that’s it. Pretty darn easy. Plus economical too! A bag of Feather Finish costs about $15 (in our case, the loft needed one full bag), and then you’ll need some concrete stain. A whole new floor for about $30 in materials! The reading loft is really coming together.
One last note: as I mentioned above, the reading loft is low-traffic area. The concrete is doing great, but I really have no idea how this would hold up in a hallway or kitchen. That said, I think we might try it in another space — possibly the boys bedroom, or even the family room! If we do, I’ll be sure to share anything new we learn.
I’d love to hear what you think about our DIY concrete floor! Do you like the look of concrete floors or are they too industrial feeling for you? And would you ever try this sort of project/experiment yourself? Or do you prefer to stick to more proven methods?
Credits: Photos and text by Gabrielle Blair.
Love how this turned out and fascinated by the process! I’ve always liked the look of concrete floors and I love industrial elements — so long as as space is still warm. An area rug is a great way to do that. I really like the stain you used — it really added something special. Would love to hear how it holds up if you do this in another room.
I’ll be sure to report!
I’m thinking of doing this floor. I was wondering how, several years later, this held up??
I’m so excited I found this post. I will be attempting the same process for an entryway. How has this held up through the years? Has anyone else added the burlap process?
I’m going to try this. What did you mean by adding burlap cloth first? Literally just cover the plywood with burlap cloth and just start pouring the concrete stuff over it and smooth it out the best I can? The burlap cloth wont make the floor bumpy?
oops I commented in the wrong section lol And I found the answer in the other comments :p
I like the look, but I don’t think I would have thought of it for a reading loft–it seems too hard to plop down and enjoy a book. I can’t wait to see it with the furnishings, though! :)
I fully agree, Emme — concrete definitely doesn’t lend itself to plopping down! I think that’s why my initial instinct was wall to wall carpet for the loft. But ultimately, I’ve found I have an easier time keeping hard surfaces clean (like wood or concrete or tile), and then softening the spaces with area rugs.
In these photos, I’m showing the concrete bare so you can see more of it, but when I show the finished reading nook, the floor will have an area rug, plus floor cushions. So hopefully it will be cozy and inviting — and easy to clean too!
Wow this is AMAZING! I feel like this is the solution I’ve been looking for my loft as well! It’s funny I read Jenny’s blog and saw that post but never considered it for flooring! I def have plywood seams tho, can you explain a bit about the burlap fabric process. I’m so excited to do this project!!!! Any more tips you can share will be so appreciated :)
I’m so intrigued by it, too! I’ve never tried it, but the process was described to me as stapling down a single layer of burlap over the entire subfloor surface — making it as flat as possible. Then, you apply the concrete mixture directly on the burlap.
If you’re doing thin layers, I’m guessing it will take a few layers to build up until the burlap is completely covered. Or perhaps you just start with a thicker layer and then go thin from there.
If I try it, I’ll certainly let you know!
While I like the look are you not worried about having a hard floor like that and your kids falling over and hurting themselves? I was a pretty clumsy kid and I can’t count the amount of times carpet saved me from serious injuries.
In a similar way the “soft” tarmac in childrens playgrounds once saved me from breaking my neck and I only got a concussion.
Or is that where the rug will come in? I avoid rugs as I usually slip over on them, maybe I’m a clumsy adult too Ha!
Hi Katie. Good question. In the loft, the space is so small, that the kids can’t really do much of anything rambunctious, so I haven’t worried about them getting hurt on the floors (I’m more concerned about them falling down the ladder!).
My experience with hard floors (we lived with many in France) is that they worked out really well for the kids. They’re easy to maintain and you can soften the room with area rugs.
I really like the flexibility of area rugs — they appeal to the designer in me who likes to switch things up and try new layouts and color schemes in a room. And they’re easily replaceable if some kind of crazy damage or flooding occurs. But I know others really love the comfort of wall to wall carpet. I’m betting it’s one of those personal preference things.
I love this! I really like the look of concrete floors, I like them even more now that I know it can be done cheap. Thank you!
Thanks, Betsy!
Jenny’s blog is popular so I knew where to go but was surprised when I tried to click over to her tutorial by clicking on her name in your post and you hadn’t linked her. Probably right to share the love, and pageviews :)
Jenny’s a good friend of mine and I linked to her twice in the post — or at least I thought I did. Did I forget one? Or maybe the links aren’t working for you? I’ll go double check. Thanks for the heads up!
looks great! would love to play with color and concrete. the small space is perfect for concrete. looking forward to the reveal.
I followed your blog in ’09 and then had got lost in having/keeping up with 2kids. it’s been SO fun to catch up these past few weeks. I especially LOVE your picture book reviews and TreeHouse odyssey. I know the “big yellow house” that got away. It was a short lived pipe dream for me too, (I still do drive-bys!). I think you scored big time w/ The Treehouse!! Thanks for the inspiration. xo
I have wanted to do this ever since I found out about the Feather Finish product. It was originally developed for flooring. Please, report on how it wears, cracks, etc. Can you put it over a concrete slab?
From what I’ve read, Feather Finish is ideal to top off a concrete slab. If you try it, I hope you’ll let us know!
Does this crack? Being thin, I would be worried of it cracking.
Hi Gabrielle,
This is a bit off topic of concrete flooring, but I hope you will be interested anyway. I am just getting the wheels spinning on a fun and kid friendly humanitarian project that was, in part, inspired by Design Mom! I remembered a post you did on the scarfs made in Africa by Fashionable and tried to capture some of their ideas in my project. I would love to bring more exposure to this project and would like any thoughts or suggestions you may have. I have started to blog the project at http://www.schoolties.wordpress.com
We hope to go non-profit soon and take this program to schools across the country.
Thanks,
Kelly Swanson
Wow ! That floor looks great ! I worked with concrete before but never used concrete stain. I love that look. Will try it out with my next concrete project. Thank you for sharing.
Great post! I’m surprised nobody’s asked yet, but where did you get that awesome pillow?
Looks really great, seems like it was fun to do also. I never would have thought of that finish in a space like that. Keeping it clean is going to be easier than lugging a vacuum up ! Love the look of the stain. Looking forward to seeing the finished space.
Thanks, Dale! I thought the same thing about the vacuum. : )
What a great solution. I can’t wait to see the finished product.
With such a thin layer of concrete are you sure it won’t crack? or chip away? I guess with such a low investment you’re just going to wait and see….it just seems so thin! If it doesn’t…what an excellent way to go
No chips so far, but who knows what’s coming down the road. Ask me again in a few months. : )
I’m actually very hopeful. Everything I’ve read about Feather Finish says it’s wonderful for this type of application. I guess we’ll see!
I really like how this came out! And what a budget-friendly project. I’m interested to see how it holds up – please keep us posted!
Yes! My mind is already churning!
You always have great ideas that sound so challenging; how do you make it look so easy?
I am really curious as to whether the concrete will crack. My other thought was- can the kids use chalk to draw on this? Looking forward to seeing your nook when it is all decorated/furnished.
On ours, there is a slight crack along the plywood seams, but we were expecting that. Otherwise, no cracks at all so far.
I love the look with all of the swirls and patterns from the tools you used. Great job!
Just a quick question about your chili recipe (sorry to include it here… wasn’t sure if you would check back on the chili comments this many days after). I made your recipe with a crockpot on low; it started almost 4 hours ago. You don’t say to stir and I followed your directions literally. The 2 spoonfuls of cream cheese are still on the top of the mixture. Is this normal? Should I have stirred everything before I closed the lid? I know you don’t make it with a crock pot… It does smell great!
Hi Amy! Yes, definitely stir it up.
Do you think this would work in a small bathroom/laundry area?
I imagine it would, but it probably depends on how much traffic the area gets. Our floor has been in for a a few weeks now and still looks great — but that’s not enough time to really test.
love how this turned out. will definitely keep it in mind for some floors in my future house. i adore the stain. great job.
That’s nice! Just like the ferry building floor! Sometimes it cracks, not sure how would you avoid this? Fantastic job !
This looks so great! I would love to do this in the old part of our basement! It looks just like the industrial floors in cool shops that I love! Thanks for sharing this tutorial!
Ohh, love the floors!
where did you end up getting (or making) your wood crate shelves?
I love the look! Thanks.
Hi Anna! I love them too. We ended up having them made/making them ourselves. I’ll be sharing a tutorial in the next few weeks!
I live in an apartment building and I guess I better not try this! But I do not like my parquet floors, and I am looking for something easy to do that will get rid of that look.
Very cool! We live in Oakland and have this funny little office with uneven floors. I wonder if it would help even them out? Where exactly did you find the product in the Bay Area or did you order it online? Thanks for the demo!
The last time my husband went away I painted our upholstered beds with white house paint, and the results are great….don’t know if I would have had the nerve to do it with him witnessing the process! Good for you on taking the chance with the concrete, if it doesn’t quite hold up, at least you learned how much you love the concrete!
A couple comments on wearing…we did our kitchen counters per the LGN diy in September. One of the first things I learned is that the sanding step is CRITICAL to getting the hardest finish possible. The stuff sands so easily (and with major dust!) that it was really hard to not go all the way through to the original surface. After three sections of counter I landed on the best technique – a couple light layers to level the substrate and make a foundation, followed by 3 heavier layers about 1/4″ thick. I allowed each of the last three to dry thoroughly then sanded til really smooth. You could see the areas getting harder and less porous before your eyes. We finished with three coats of a concrete sealer made for counters so it was safe for food prep.
As for wear- the surfaces (especially the last one I did) have held up really well. Water or oil that is left for more than about 5 minutes will stain, but dry out over time. Other things (red wine, various food) when wiped up pretty promptly, leave a faint stain but it blends with the variations in the concrete color. The only real problem is the edges. I tried to really get a good amount on the square laminate sides and edges, but in a couple places where something banged against it, it chipped. It’s not hard to mic a little to patch but irritating non the less.
Be prepared for a ton on dusty mess when sanding and wear a mask and glasses.
Overall I would do it again, everyone loves how the counters look!
To keep the dust down, I used wet/dry sanding paper and/or sponge with a little bit of water for sanding. It smooths out the service was faster, easier and with no dust at all really. It almost seals itself. I did feather finish over existing old laminate countertops over 5 years ago and they still look great! No chipping or cracking. I like to stir in a little color pigment powder right before I apply the feather finish for a marbling look. It’s SO much fun! I use it for everything…. Patch holes, cracking drywall, floors, counters, level out uneven surfaces, as filler putty (it’s easier to smooth out and stays put better than any putty I’ve ever used). You’re only limited by your mind.
I LOVE these. I’ve been tempted to try these for years and seeing these tempts me to no end! Thank you for sharing.
PS, I’ve reading details now… and … oh, I do the same thing: every time my husband travels I have this extra strange energy and I re-construct the house. I’ve moved entire rooms, painted ceiling murals, torn down wall paper, etc while he’s been away. What is that?! …. I’ve never regretted what I’ve accomplished and love this, too! … now , to see if I can find any of these products in Sweden…. Thanks for sharing!
We’ve been planning on doing just this in our new master bath!
I’m excited.
I’ve worked with a similar concrete product on our boys’ bathroom counter top, and loved it.
We’ve also made our own concrete kitchen counter tops. I love them, too – but the faux-finish is so much easier.
Your floor looks great!
Very nice! Does it shrink as it dries and cures like thicker concrete? Will you use baseboards at the perimeter? Will you trim out the hatch opening? I like the idea of cool concrete here, because heat rises, and carpeting might be too uncomfortable in warmer months. You can always throw down a lambskin or other cuddly in the cooler months.
wow, this is fantastic! i wonder if this stuff would work as a wall finish?? very awesome!
Love it! I’d love concrete downstairs in the rumpus room, but it will be very $$. (At the moment we have super classy salmon tiles next to blue carpet (hmmm) It’s a high traffic area though, from the front door, leading to carpeted (completely different carpet) stairs. Wonder if u I could convince hubby to lay ply and do ur trick!!
Nice Blog ! love the floors…
I love this! I’m thinking of doing this to our sunroom. Any pointers on where to find a tutorial showing how to lay down the burlap first? Thanks!
I love this post! A question about the stain – is that the ‘brown’ color in the pic, or the ‘blue’ color…in other words, did you warm up the actual color of the concrete, or cool it down…
I have a sunroom with this finish calling its name! Thank you!
The concrete was a straightforward grey and the stain seemed to add both warm and cool tones. Not sure how it works, but it looks great!
I wanted to let you know that I did this finish on my sunroom floor, and it is so happy looking! I’ve had it for a couple of months now, and it seems to be wearing beautifully. The guy at the place where I bought the Ardex looked at me like I was crazy when I told him what I was doing. Little did he know! Thank you so much for the tutorial :)
How is this holding up almost a year later? What was your subfloor?
Would love to hear an update and any reflections you have a couple months after the fact. Have you noticed any wear yet? Is it easy to clean?
No noticeable wear beyond the hairline cracks at the plywood seams. I’m still loving it! It’s so inexpensive, that for me, it’s one of those things that’s worth a try. If it doesn’t work, you can always lay carpet or tile or VCT over it.
I’m thinking of doing this in a small space, but there’s a tiny bit of flex in the floor plywood flooring (3rd floor, older home)… Have you seen any cracking in your reading loft ?
Yes. There are hairline cracks at the plywood seams. I don’t mind them. But I am told if you staple down a layer or burlap first, and then add the cement layers, that it will prevent those cracks. I haven’t tried it, but it might be worth a shot.
Hi there, Great post!
I’m so curious to hear how well the loft floor is holding up.
I have 2 children’s rooms that have had their carpet removed (for some time now) and absolutely need something in the mean time until we can afford our timber floorboards through out the whole house.
Has it cracked? gotten dusty/chalky?
I can’t stop thinking about this, please put me out of my misery.
My husband says no it won’t work, but I don’t have a problem at all about proving him wrong lol. He and our son go away in a few weeks so Id love to get it done then when its just my daughter and I at home.
Thanks in advance!! :-)
Hi Nova. The floor is holding up wonderfully. No dust or chalkiness at all — the sealant prevents any of that. The only cracks are along the plywood seams, as I mentioned above. There are no other cracks at all (hooray!). This is not a space that gets tons and tons of traffic (like a hallway), but I’m impressed so far.
Even with cracks on the seams, it’s definitely a big improvement over bare plywood. The cracks are hairlines, nothing major at all. And if you’re up for experimenting, you could certainly try to staple down a layer of burlap first and then add the concrete over that. Supposedly, that prevents cracks on the seams.
Good luck!
Really loving this look! A great alternative flooring that will be extremely durable. Thanks for sharing your project, I will be definitely trying this on my new project.
I am thinking of doing this in our half bath. I see other tutorials use several steps and water proof barriers such as felt paper, metal lath, crushed stone, sand, 6 mil sheet plastic for vapor barrier, insulation board etc.
Yours seems WAY more simple! Do you think for a half bath on the main floor these other steps should be taken? It is used daily by our family and guests when they are here.
Thank you!
Hi Jill! I would be very nervous to try this method in a bathroom that is used daily. I would definitely think using a water proof barrier was necessary.
I am considering do this project in my main floor. I will be going over old hardwood flooring. I know that going over hardwood is not common. Most post are on installing hardwood over concrete not the other way. I love the look of concrete floors but can not install them due to weight and the height increase.How has it held up? I will take your advice and lay burlap down first to avoid cracking as much as possible. Will I need to follow the standard rule for expansion joints for concrete?
Hi Shannon,
I’m reading your email question from Perth Western Australia.
I just love this tremendous opportunity we have in being able to layer concrete on floor boards.
I’m in a similar situation as you had. I would very much like to know how you went particularly if there is any cracking.
Looking forward to hearing from you
Regards
Anton
Pingback: DIY Concrete Projects | Petite Modern Life
Pingback: Creative flooring ideas - Andrea's Notebook
hi there! i’m thinking of doing an entire kitchen floor with this awesome DIY project. it’s my office kitchen – approx 15′ x 13′. what do you think? will it hold up well? also, it would be my first wild DIY project – do you think it’s too much for a beginner to take this on? and lastly, do you think it would work over very old kitchen tiles (cheap linoleum)? would appreciate your input!
I was thinking about doing this over my kitchen/dinning room linoleum too. Did you try it? How did it work? I have a split level home so my kitchen is over my basement so I don’t want heavy concrete..that is why I’m so interested in this process.
Amanda- Wondering if you ended up putting this over your linoleum and how it turned out.
Could you tell me what color stain and brand you used as well as the sealant?
this is awesome and you made it seem so easy! i might try this (for practice) in a walk-in closet first! i want my bedroom floor concrete!! thank you!
That’s really pretty and a very good idea. I’ve seen the counter top redos, but never thought about flooring! I also love the idea of how easy to clean it would be… hmmmm!!!
Thanks for the auspicious writeup. It if truth be told was once a enjoyment account it.
Glance advanced to more delivered agreeable from you!
By the way, how can we communicate?
Pingback: DIY Home Decoration: 10 Rooms With Affordable Materials, Looking For Great | DIY Home