By Amy Christie.
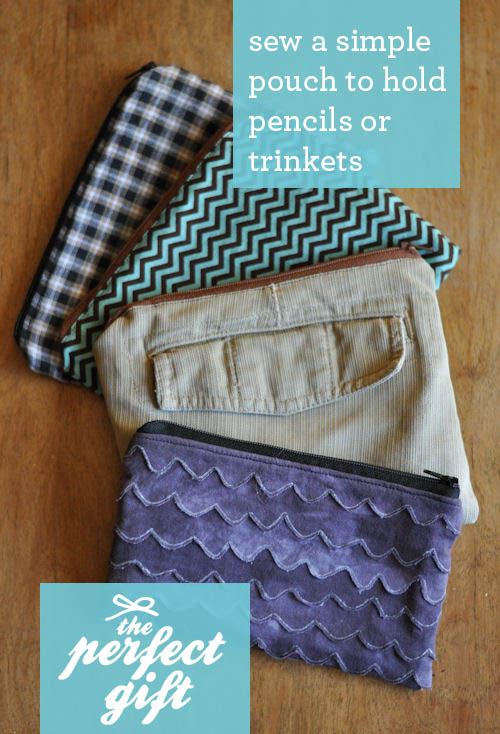
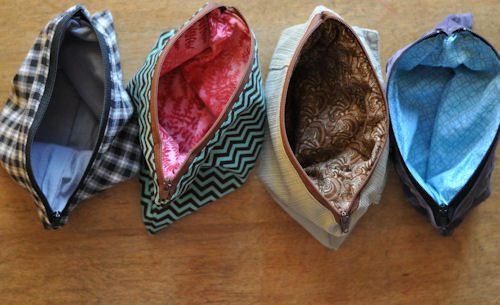
Gabrielle has mentioned that in France, her kids are required to carry pencil bags at school. So I thought it would be fun to create a DIY for a simple and easy zipper pouch in fun fabrics that could work for boys or girls. It would make a fun fall gift for your child.
But then I made some, and I’ve been using them for all sorts of tasks! Who doesn’t love a little pouch to zip up things in?
I’m going to tell you right now: Sewing is not my forté. Add zippers to the mix and I start sweating. But this little easy zipper pouch only requires five lines of stitching. Five! That’s it! And two of them are for looks so if you nix those, you are down to three. If I can do it, so can you.

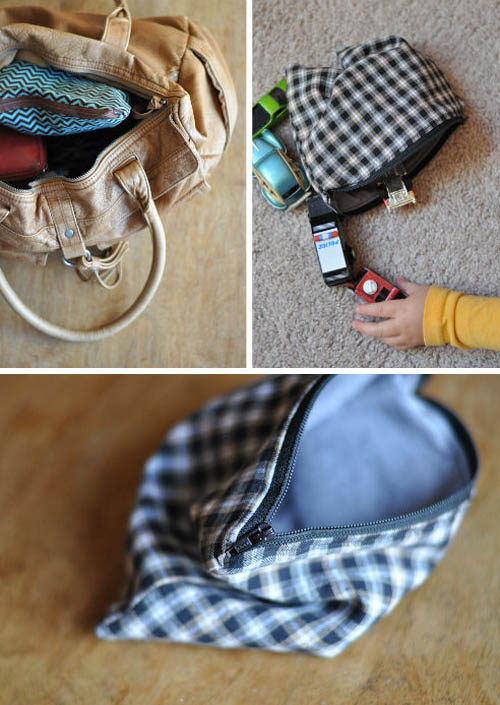
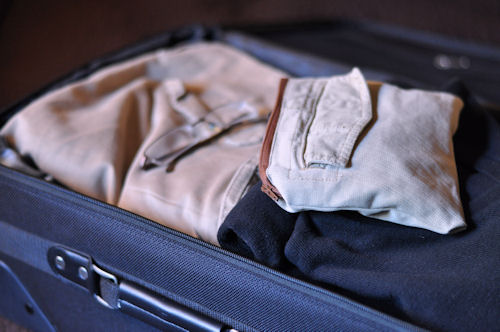
Try this easy zipper pouch tutorial, and I’m betting you’ll be adding pouches to purses, suitcases, and yes, backpacks too!
Lets get started.
Simple & Easy Zipper Pouch Tutorial:
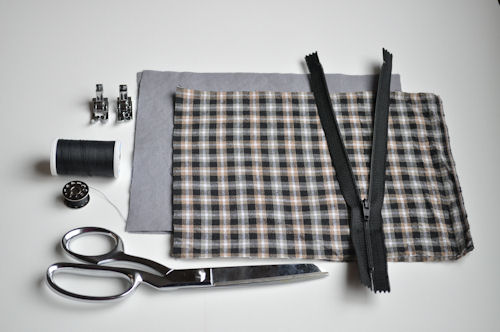
Supplies Needed for your Zipper Pouch:
-inner and outer fabric, cut to size and pressed with an iron
-zipper
-thread
-scissors
-needle
-zipper foot — not necessary but beneficial
-iron
The dimensions of this easy zipper pouch are 9 inches by 7 inches and the zipper is 9 inches.
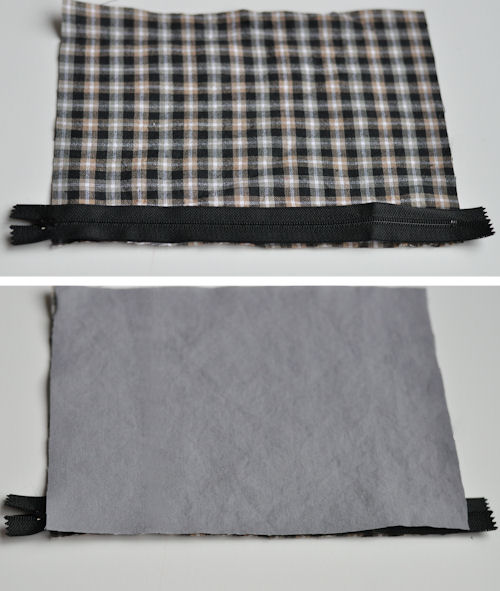
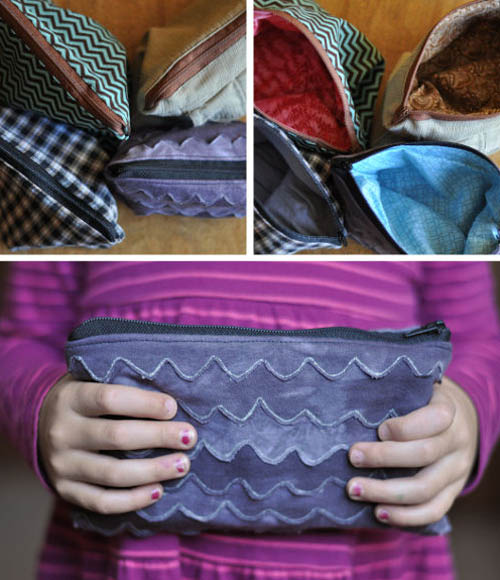
1. Stack the fabric. First, lay down the outer fabric, right side up. Add the zipper, right side down. Top it with the inner fabric, right side down.
If you have a zipper foot, add it to your machine and sew the stack together.
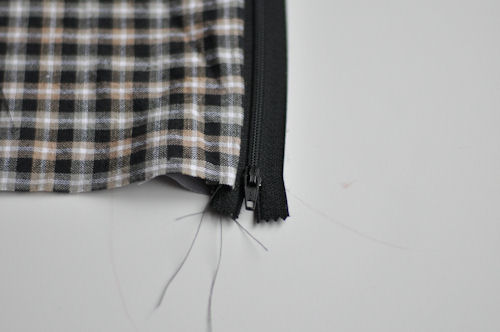
2. Repeat the stack on the other side — the outer fabric, right side up, the zipper, right side down and the inner fabric, right side down.
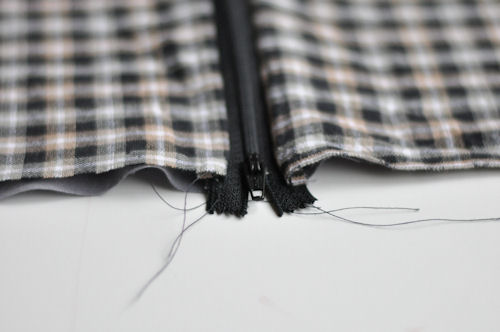
Sew the stack together.
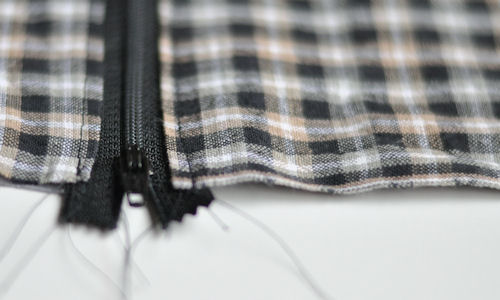
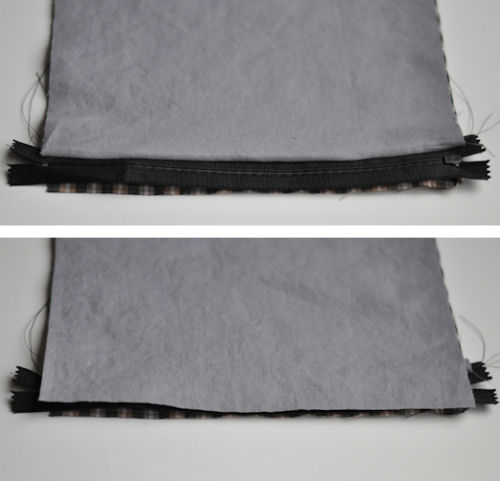
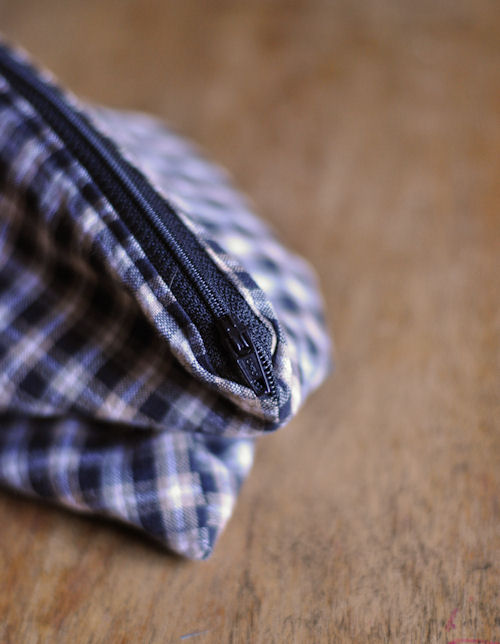
3. This detail is optional. Press the fabric around the zipper, get it to lay flat. With the regular sewing foot back on, topstitch on either side of the zipper, very close to the fold. It holds the fabric back from the zipper and gives it a finished look.
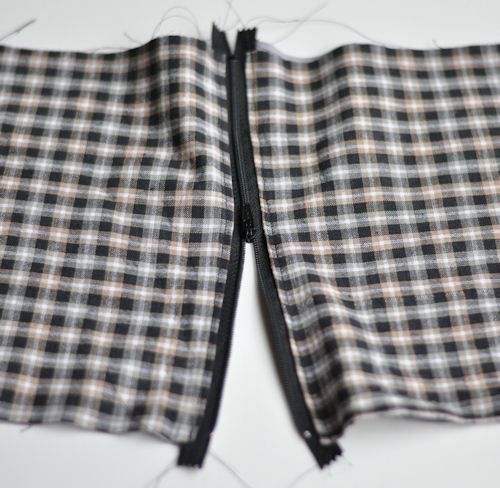
4. For the final leg of stiching, begin by unzipping the zipper half way.

Pull the outer fabric pieces together and pin. Do the same with the inner fabric pieces.
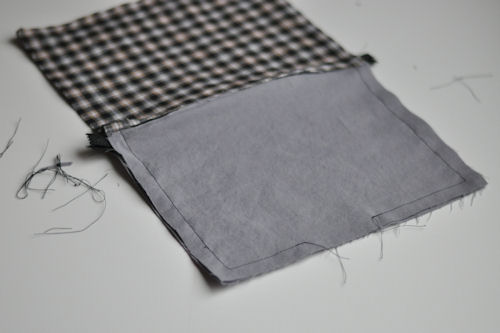
Using a 1/2 inch inseam, begin at the bottom of the inner fabric and sew all the way around the pouch, stopping to leave at least a three inch opening. Trim the threads.
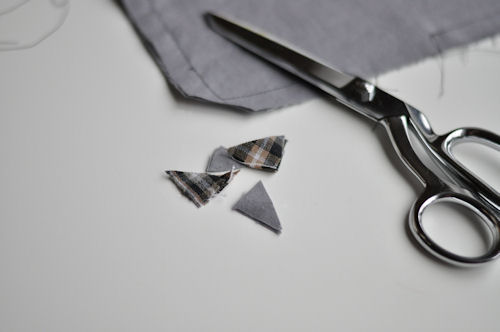
Trim the corners and turn right side out.
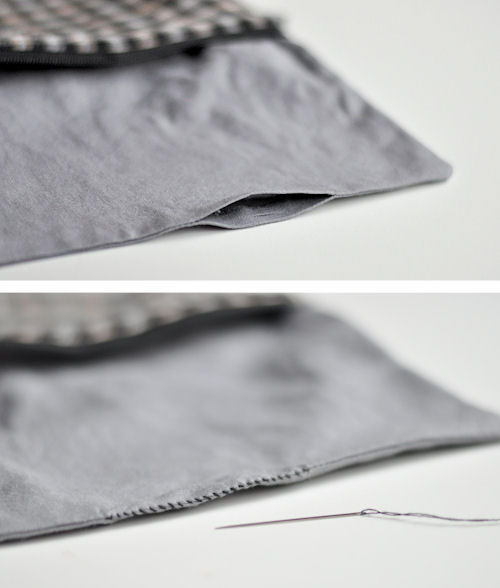
5. Use a thread and needle and hand-stitch the opening closed at the bottom of the pouch.
Then you, my friend, have sewn a zippered pouch.
THIS EASY ZIPPER POUCH WOULD ALSO BE GREAT FOR:
– A cosmetics pouch for your teenage daughter.
– A pouch with simple medicines (ibuprofen, pepto, bandaids) for a friend taking a big trip.
– A toy pouch filled with surprises for a car ride.
P.S. — We love making gifts! You can find all the posts in this series here.
I love these! And your tutorial is great. I actually held a class in my shop last week doing little pouches and we lined them with laminated cotton. Such a great little project!
Laminated cotton is something I want to try soon. I bet it makes a great inside material. Easy to clean!
If you unzip the zipper, you do not even need to hand-stitch the lining. See the technique here:
http://www.noodle-head.com/2012/06/open-wide-zippered-pouch-diy-tutorial.html
Thanks Nicola! I’ll have to try that next time.
She actually leaves a small opening as well. And her bags are not as quick to finish.
really cute!
Great idea! Zippers give me hives, too!! Thanks for the perfect step-by-step directions. I know four children at this house who will be having new zippy bags in the near future…and one mama, too!
My two little ones have taken these four for their own so I need to make a few more for myself! Good luck!
Awesome! Boy am I craving my grandmother’s sewing machine! I haven’t sewn (or attempted really) anything in DECADES! Oh my :(
I’m going to pick up some zippers and make this….several times as christmas gifts for teachers. I love little handmade gifts!
I love these so much, Amy! I’m going to show Maude your awesome tutorial. I’ll bet she’d love to make these for her friends!
I definitely want to give this a go and you could go a little larger and create an i-pad case…
Oo, I like that idea April! Might have to try that too.
thanks for the tutorial, looks easy enough if I can remember where the heck I put the zipper foot! I’m going to make my daughter one for her cosmetics…
I love to sew, but zippers make me sweat, too! Thanks for your encouraging words about this cute little project–I think you’ve given me the confidence to try!
Good luck! Be fearless! :)
Pingback: Perfect Gift with Design Mom: Easy Zipper Pouch | this heart of mine
Pingback: Wednesday: Newsy Snacks For Busy People | justb.
Brilliant!!!!! And so simple, oh my gosh. I think I’ll attempt one over the next few days. I’ve always loved sewing but don’t really ever take on projects much because I don’t want to leave sharp things (needles!!) lying around while I chase around my (almost) 3 year old.
But this doesn’t look too tough – and it doesn’t look like it’ll take long. Ooh, fun!
Pretty much everyone on our Christmas list got one of these last year :)
Pingback: monday: best of last week | The Misadventures of Kelly and Kelly
I going to make these pouches for Christmas gifts. I have 6 granddaughters, and 1 daughter, 3 daughter-in-laws. I see a lot of uses for these cute pouches. Thanks for giving directions for putting them together.
Pingback: Repurposing for Incredible (re)GiftsStorage Talk
Does anyone know if the finished dimensions are 9″ x 7″ or the 9″ x 7″ refers to the size of the cut fabric?
Beginning sewer over here, but thanks for the tutorial!
9″x7″ is the dimension of the pre-sewn fabric pieces. Once it sewn the pouch is 8″x6″. Hope that helps! Good luck!! :)
Thanks for your speedy reply!
one great tutorial after the other – you teach oh so clearly!
thank you
I love this! I found a similar tutorial about 1 & 1/2 years ago and used to make them for my friends and family. I recently tried to go back to the website from which I followed the tutorial, but it was set to private and I could no longer see it. Thanks for sharing this! I would love to feature this on my blog. Would that be alright?
You bet!
Pingback: Easy Fabric Zipper Pouch - MarriedAndBuriedInDebt.com | MarriedAndBuriedInDebt.com
Okay….I’m making my first pouch and installing my first zipper. When you say, “Using a 1/2 inch inseam, begin at the bottom of the inner fabric and sew all the way around the pouch, stopping to leave at least a three inch opening. Trim the threads.”….do you mean we sew over the zipper on the sides? I just want to make sure I do this properly…thanks,
Pingback: Red Tricycle | Creative Homemade Gifts | Easy DIY Christmas Gifts ideas
I found this tutorial and promptly made myself a zippered bag for all the little accessories that came with my new sewing machine! It was actually the second project on my new machine.
In feeling very smart, I decided to make a second pouch. *NOT* paying attention at all, I put the zipper on the wrong way! Instead of putting it on the 9″ side, I put it on the 7″ side (and of course did *NOT* think there was anything wrong with cutting off that much excess zipper!
Imagine my surprise when I finished my zippered bag, that I had not a cosmetic bag but a bag that would house my other christmas present – my NOOK HD!! A happy mistake :D My nook now has a nice home (oh and I decided to iron on some fleece to make it poofier? Eh, good idea for my nook, not a good idea for a cosmetic bag :)
Pingback: Sew Gratifying | Seeking Joyful Simplicity
Pingback: Diy – Necessarie › Marília Julieta
Pingback: 4/365 - Sew a Zipper Pouch | Slowdancing with Strangers
I love this tutorial. It’s so simple to follow! These are some of the best things to make to give away at a party.
Sharon Perkins: I did that too! I was in the zone and sewing a bunch of these when I realized I had just finished sewing one and the zipper was backwards! Lol.
This is a great step by step tutorial, thanks for the design :-)
Thanks for finally talking about >The Perfect Gift:
Easy Zipper Pouch <Loved it!
Excellent tutorial…. how many times do I forget to unzip that damn zipper – LOL (enough to become an expert at unzipping from the wrong side with a large needle!
I dont know sewing using machines.. Can i sew the zipper manually without a machine.?
Pingback: 10 Things Project:: Sewing for the next 30 days | Prototype Mama
Pingback: Fabric Bin Logic | The Gift Fox
Pingback: Yurtmade Christmas | Circle In
Pingback: 100+ Free Zipper Pouch Patterns - The Sewing Loft
I need to make some zipper pouches! Love your instructions. I think ill unzip the zipper at the end to make it easier to turn right side out. I love the pocket one! I have a bunch of cargo shorts I need to recycle and my hubby could really use a guy one!
Dear Amy,
I chanced upon your tutorial & love the way you have done it as it iss very easy to understand. May I ask if I could use your tutorial to teach some of my friends how to sew beautiful pouches like these? I would like to have your permission to have them in printed copy if possible. I intend to teach them how to hand-stitch the pouches instead as many of them do not have sewing machines. Of course I would adapt your tutorial to a hand-stitched method. Hope this is ok with you :)
Have a good day ahead.
Cheers,
Judy
Great tutorial! Just finished my 1st one. I needed a finished 9×7 so I cut 10×8 fabric. To customize a size add an inch to your desired finished pouch, also adjust purchased zipper length.
Pingback: Cardigan Blog
Pingback: Learning to Sew - Taproot Tunic and Beginner Resources and Project Ideas
Great tutorial! I’m making a brides pouch for another teacher at school. I think I’ll make some for my students next year for organzing their writing utensils in their desks. So excited!!!
Pingback: 50 DIY Gifts for Parents (Quick, and Frugal Ideas) - lineup-mag