It can seem like a daunting task to roast a turkey! I know I was a little panicked when I hosted my first Thanksgiving dinner. I put a lot of pressure on myself because I wanted the turkey to steal the show. (I knew the sides would take care of themselves.)
After consulting my gigantic stack of cookbooks and foodie magazines, I felt prepared. As I slid the roasting pan into the oven, I wiped my hands on my apron and said, “Well, that was easier than I thought it would be!”
Follow these tips for your own juicy Thanksgiving turkey and you’ll be saying the same thing!


HOW TO GET A JUICY THANKSGIVING TURKEY – THAWING
Before we start, there are several different kinds of turkeys available — self-basting, kosher, and natural. You’ll find these fresh or frozen. (Note: some turkeys are partially frozen and still labeled “fresh.”) In this tutorial, I’m using a fresh, all-natural, free range turkey. While I don’t mind using the turkeys treated with salt solutions, I do prefer seasoning them myself for greater control. But that is just a preference.

The first step is to thaw your turkey. If you have a fresh turkey, you can skip this step. Make sure to thaw your turkey at the proper temperature to avoid bacteria growth. Thawing can be done in the refrigerator or in cold water, which takes about 3/4 the time. Be sure to thaw the turkey over a rimmed baking dish so the juices don’t run all over and contaminate other foods and surfaces.
Secret #1: If you’ve never cooked a turkey before, you may be shocked to find out how long it takes to thaw a turkey. Use this handy reference and plan ahead!

Once the turkey has been thawed, remove the giblets — if you like, you can save them to make homemade turkey stock. (In fact, I recommend thawing the turkey a day or two before you roast it and make the stock so it’s ready to go for gravy.) Rinse the turkey inside and out in cool water and pat dry with paper towels.
HOW TO GET A JUICY THANKSGIVING TURKEY — BRINING
When I buy a fresh, natural turkey, like the one pictured, I like to brine it to help make it as juicy as possible. If your turkey has been pre-salted (check the label), go ahead and skip this part.
Think of brining like marinating. It helps season and draw moisture into the meat to keep it flavorful and juicy. A good rule of thumb is to use 1 cup of table salt (2 cups kosher salt) and 1/2 cup sugar (white or brown) for every gallon of water. Brining recipes vary greatly on how long the turkey should brine. I allow plenty of time, at least 8-12 hours.
Secret #2: Brining means you can skip the basting later on.

Dissolve the salt and sugar in the water and add any seasonings you want to use. I like to use a combination of herbs and spices — rosemary, thyme, bay leaves, peppercorns, whole cloves and allspice, plus I put in some leek tops and halved garlic cloves for extra flavor.
Place the turkey and the brining solution into a sterilized plastic or non-reactive metal container. You can also use brining bags and place it in a plastic tub in case it leaks. You want to keep the turkey at 40 degrees F, so you’ll either want to refrigerate the turkey in the brine, or leave it someplace cool and add ice or gel ice packs. If it’s cold enough outside, you can even put the turkey in a safe place and let it brine there.


I had a tough time finding a container that was tall enough, so I ended up using a much larger plastic tub than I wanted. If you have the same problem, just be sure to follow the ratio of salt and sugar to water and you’ll be fine.
Secret #3: To keep the turkey totally submerged, top it with a heavy metal lid or plate.
One the turkey has brined long enough, remove it from the brine and rinse it well with cold water. Discard the brine.

HOW TO GET A JUICY THANKSGIVING TURKEY – PREPPING THE OVEN AND PAN
Let the turkey continue to air dry (you can do this overnight in the fridge too) and allow it to come to room temperature for a few hours before you roast it.
Preheat the oven to the temperature in your recipe. I prefer to start out with very high heat, such as 450 degrees for a half hour, then lower the heat to 350 degrees for the remaining time.
If your turkey comes with a plastic pop-up timer/thermometer, you should leave it where it is, but ignore it! If you gauge done-ness by the pop-up timer, the white meat will be bone-dry and overcooked. Instead, use an instant-read thermometer. If you have a fancy digital one, even better. Just insert it into the thickest part of the breast and set the temperature for between 161-165 degrees F.


A roasting pan is one of the most important tools for the perfect turkey. You can certainly get away with using a disposable aluminum pan if you are on a tight budget or don’t have storage space to accommodate a large pan. However, I recommend using either the roasting/broiling pan that comes standard with most ovens, or investing in a good-quality roasting pan that comes with a flat or V-rack. If you don’t have a rack, you can make your own using aluminum foil.
Here’s why that is important: You want the turkey to be elevated a bit to allow for air circulation, which leads to more even cooking, and also because as the juices drip down, they will get nice and brown on the bottom of the pan. (That’s one of the keys to really great gravy.)
I also like to dice carrots, onions, and celery to put on the bottom of the pan for extra flavor, but that is totally optional.


Secret #4: I never cook the stuffing inside the turkey. I prefer to bake it separately in another dish. A turkey with stuffing takes longer to cook and can be a huge pain.
While I prefer not to stuff the turkey, I do like to place some aromatics inside the cavity — carrots, onions, garlic, celery, and fresh herbs are great. I’ve also used apples and lemons before as well.

Before placing the turkey on the roasting rack, rub the skin liberally with butter or canola oil. And if you didn’t brine it, sprinkle the whole bird inside and out with salt and pepper, or a spice rub. The butter will help give you crispy, golden brown skin.

I also like to truss the legs together if the turkey doesn’t come with it already done for me. But don’t stress! Most turkeys come with a plastic or wire trussing. So you can just leave it be.

If your turkey has a big flap of neck skin, you can secure it using toothpicks or just tuck it in.
Secret #5: If you are using a v-rack, be sure to tuck the wings back underneath the turkey so they don’t flap around.

You might notice that the turkey is breast-side down in the roasting pan. That’s on purpose! I like to start roasting that way and rotate the turkey periodically so the breast doesn’t get overcooked.
Secret #6: Finishing with the breast side up will also give you that crispy, brown skin everyone loves to fight over.
If you have a turkey larger than 14-15 lbs., then it will be too difficult to turn it over. Just roast it breast-side up for the whole time, covering just the turkey breast (legs uncovered) with aluminum foil. (I’ll give more detail on the foil later.)
Then it’s time to place it in the oven!

HOW TO GET A JUICY THANKSGIVING TURKEY – ROASTING
A lot of people baste their turkeys continually throughout the roasting process. If you rub butter over the skin, that will be a good start and you can baste it a few times if you want to. If I brine my turkey, I don’t usually baste it. Otherwise, I baste mine when I turn it over.
Secret #7: Don’t baste the turkey during the last hour or the skin could turn out flabby instead of golden and crispy.

It’s a good idea to pull the pan completely out of the oven to turn the turkey over. That way the precious heat you’ve built up won’t escape and it will be much easier to maneuver while you turn it over. I use either clean oven mitts or wads of paper towels to protect my hands when I turn the turkey over. If you want, you can also partially turn the turkey over, allowing each leg to brown nicely (about 15 minutes per leg) before finishing with the breast-side up.

Before sliding the turkey back into the oven, I make a foil diamond or triangle and fit it down against the turkey breast, leaving the legs uncovered because they can tolerate more heat.

A lot of people rely on the leg wiggling easily to tell them when the turkey is finished cooking. I still like to rely on my thermometer. I like to take a reading in both the breast and thigh. The breast should be at 160-165 degrees F. and the thigh should be at least 170-175 degrees F, some say little as 165 degrees, but I let it get a little higher just to be safe.

If it’s not up to the proper temperature, put it back in the oven for 15-30 minutes more and take another reading.

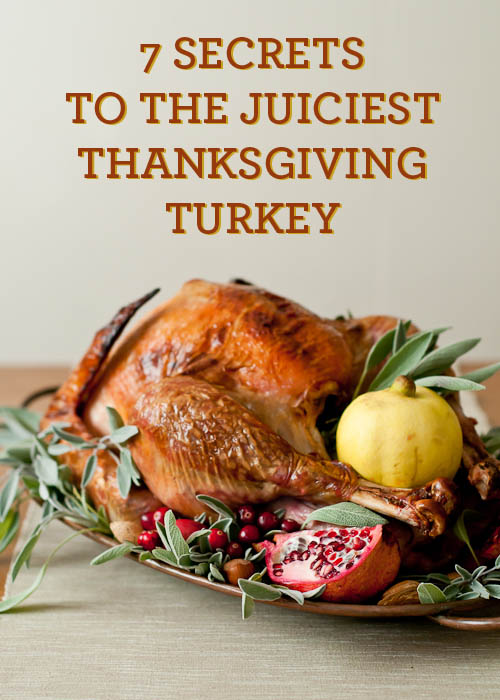
See? Nice and brown. Just like you want.

When the turkey is finished cooking, you need to let it rest for 30 minutes before slicing it. This can be done on a cutting board with a well around it to catch any escaping juices, or on a serving platter.
This resting step is super important. During the cooking process, a lot of liquid is released. Not all of that will drip down into the roasting pan. A lot of it is sitting just under the skin. Letting the turkey rest for a bit will allow those juices to be reabsorbed and you guessed it, the turkey will be juicier.


While the turkey rests, be sure to tent it with foil or a large metal bowl to retain the heat.

And you’re done!
Uncover the turkey, place it on the platter (and garnish if you like!), and take it to the table to show off. Then give yourself a pat on the back, sit back and enjoy the compliments you’ll get on the juiciest turkey ever.
Created by Lindsey Johnson for Design Mom.