
Dutch oven cooking is one of life’s pleasures. It’s hard to duplicate the feeling of cooking outdoors in a big, cast-iron pot over hot coals. It’s hard to duplicate that flavor too — a cross between cooking over a fire and using a slow cooker.
Dutch oven cooking has been around for years and years and years. Now that most of us do our daily cooking indoors on and in modern stoves and ovens, it seems like Dutch oven cooking is more for hobbyists and campers. If you haven’t enjoyed Dutch oven cooking as the cook or the eater, you’ve been missing out! It’s a lot of fun.
Dutch oven cooking might seem a little intimidating or complicated. I totally get that! But what you put into the Dutch oven is pretty simple and uncomplicated; the cooking part is where it can get a little tricky. There’s a bit of a learning curve to get the timing and temperature just right, but once those two things are covered, you’ll be set.
You can cook or bake practically anything in a Dutch oven — they are incredibly versatile. Over the years we’ve modified old family favorites for use in a Dutch oven as well as finding new ones. Keep reading for recipes, notes, and everything you need to know to get started.
DUTCH OVEN COOKING: MATERIALS NEEDED
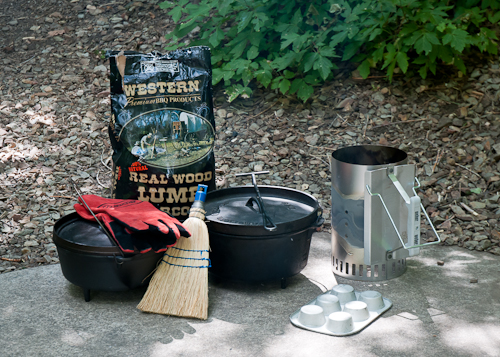
You will want to purchase or borrow a few things to get ready for your Dutch oven cooking adventures. You don’t need a ton of equipment, but there are a few essentials that you don’t want to be without.
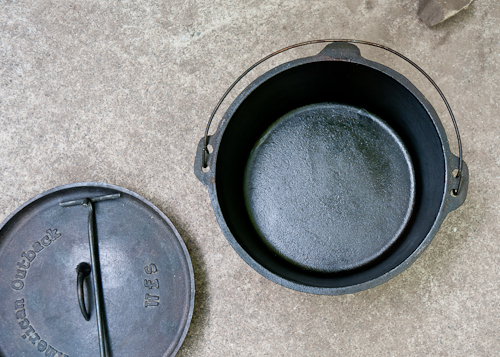
-One or two Dutch ovens (or more if you’ve got a crowd!)
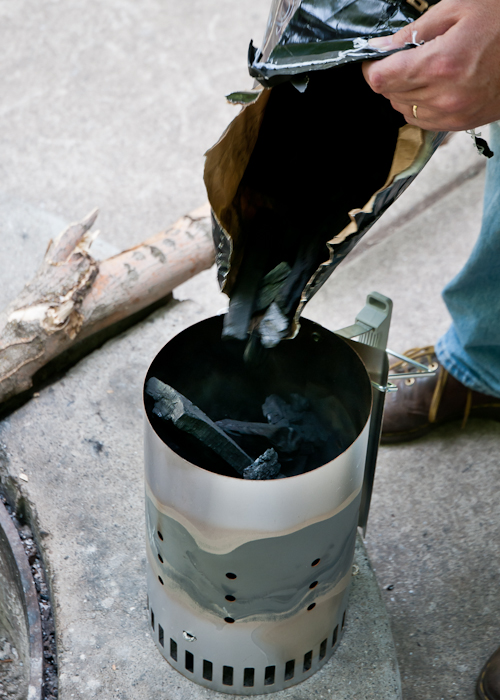
–Charcoal chimney starter
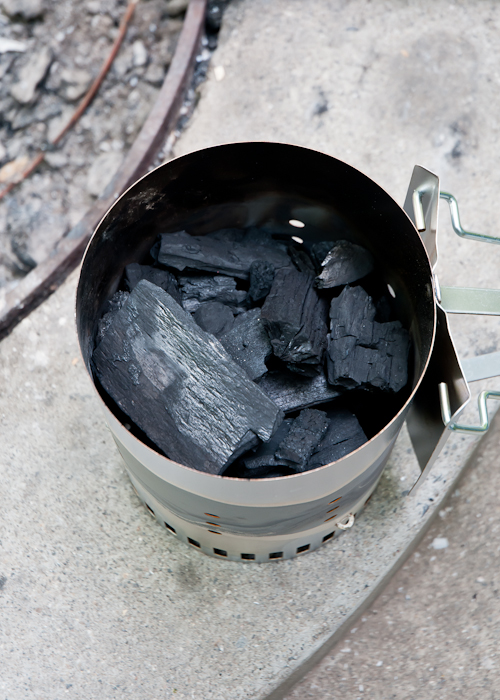
–Charcoal briquettes
-Something to rest the lid on (a muffin tin works well)
–Lid lifter
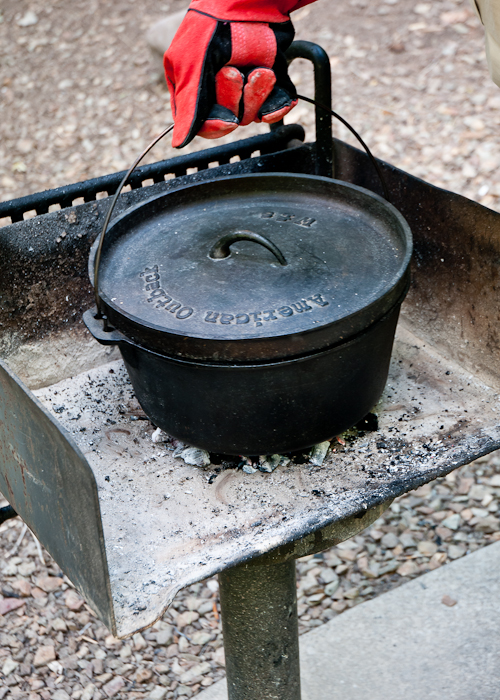
–High heat resistant gloves
–Straw whisk broom
-Lighter fluid (optional, not pictured)
As with anything, Dutch oven cooking does require a some planning and preparation.
Secret #1: You should buy a Dutch oven a little before you plan on using it to make sure you have time to properly season it. A well-seasoned Dutch oven makes for happier cooking and cleaning up. Seasoning means that it’s been rubbed with oil or vegetable shortening and baked in an oven for a few hours to develop a nice, black coating on the surface of the entire Dutch oven. It will become further seasoned as you use it, eventually becoming nonstick.
Treat Dutch ovens as you do cast iron skillets and pans. If you’ve used those, it’s the same process for seasoning and care. There are aluminum Dutch ovens available, but the most common ones sold and used are cast iron. That’s what we’ll be talking about in this post.
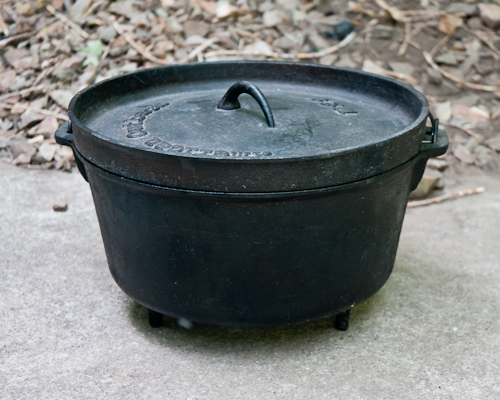
Dutch ovens come with heavy lids that provide a good seal during cooking. Because the Dutch ovens are made of heavy cast iron, they retain heat very well. In fact, they can stay warm for hours and hours after cooking. Dutch ovens are best used for recipes requiring a long, slow cooking time, like stews, roasts, chili, etc. But they can also be used for things that cook in 30 minutes or less, like quick breads, rolls, cakes and cobblers. Dutch ovens lend great flavor to food from the oven itself and the charcoal briquettes. (You can’t get that from your indoor oven or a slow cooker!) Though I’m not covering the techniques in this post, dutch ovens are great for cooking bread and deep frying, as well.
Generally the cooking temperature will be about 350-400 degrees F. The cooking heat is generated from using coals placed underneath the pan and on top of the lid. You’ll see Dutch ovens with flat bottoms or with three little legs. The flat ones are better for indoor cooking. The ones with legs are the kind for outdoor use. I’m sure they were designed that way for other reasons too, but the little legs are nice because the Dutch oven keeps upright much better over the coals.
Let’s talk about the charcoal for a minute because it is such an important part of Dutch oven cooking!
DUTCH OVEN COOKING WITH CHARCOAL
For getting the coals hot, we prefer using a charcoal chimney starter.
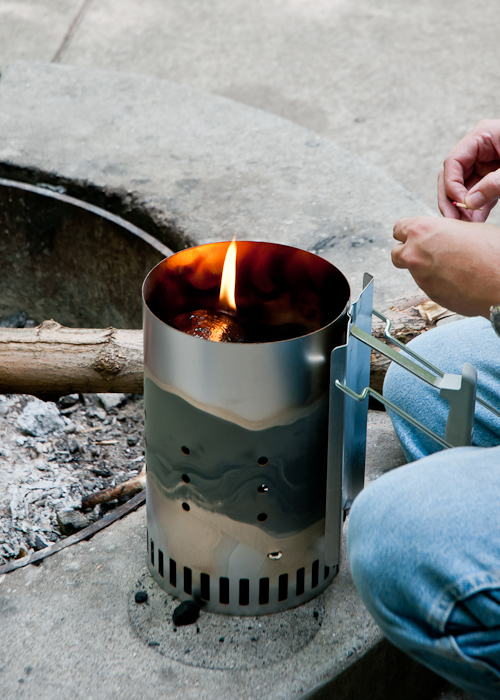
The advantage of a charcoal starter is that you can get the coals started quickly and (usually) evenly. The tall chimney shape keeps the coals protected from wind and keeps them together as they heat up. I honestly would recommend investing in one if you do a lot of cooking with charcoal. Secret #2: The charcoal needs to be started about 20-30 minutes before you plan on starting to cook. If you use a charcoal starter, it might only take 15 minutes. I use that time to mix my ingredients together. By the time I’ve put everything into the Dutch oven, the coals are hot and ready to be used.
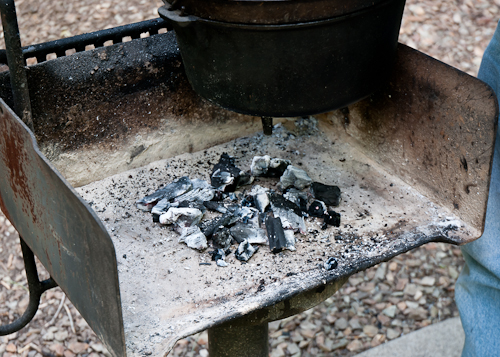
Directions for lighting charcoal:
Put charcoal in charcoal burner, drizzle with a little lighter fluid (optional, but helps to get it going quickly), the carefully add a lighted match.

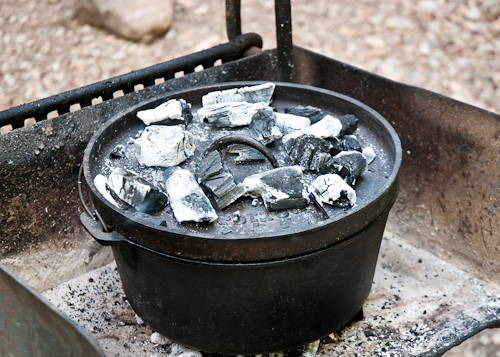
The general rule of thumb is two charcoal briquettes per inch in diameter, and typically more coals are placed on top than on bottom. For example, a 12-inch Dutch oven would have 14 coals on top and 8 underneath for a temperature of about 300 degrees F. Secret #3: To raise the cooking temperature 25 degrees F, add an extra (preheated) briquette on both top and bottom.
Secret #4: The arrangement of the coals also matters. They need to be arranged evenly both top and bottom. Usually this is a circle around the perimeter with a few in the center. I’ve arranged them a little differently here because I was using the hard wood briquettes and they weren’t uniform in size.
Ovens can go almost anywhere to cook just about anything you want. This could be your backyard, a park, campsite, etc. Just make sure the surface is heat proof. Concrete works great as does dirt. You can use Dutch ovens in a fire pit or on a grill like the one in the picture. I chose to do it this way for this post because I liked that it was high off the ground — while my kids were running around and playing. It also made it easier for me to check on it. But we also like placing it in on the ground in a fire pit because we can cook other things over the coals at the same time. Either way works great!
Dutch ovens come in various sizes. The most common sizes are 10″, 12″ and 14″. They also vary in depth. The bigger (and deeper) the Dutch oven, the more people you can feed, and the heavier they are. Keep that in mind too. We usually use 12″ ovens to cover our basic cooking needs.
DO’S OF DUTCH OVEN COOKING
Let’s talk a bit about the Do’s of Dutch oven cooking.
Secret #5: Do season it well and then rub the inside with a little oil every time you use it.
Even though the Dutch oven has been seasoned, it’s a good idea to rub the inside with a little oil before using it. I just pour a little in the bottom and use a paper towel to wipe the entire inside. The outside doesn’t need to be rubbed with oil again before cooking. Also, Dutch ovens don’t require preheating, so unless a specific recipe lists preheating as part of the instructions, you won’t have to worry about doing that.
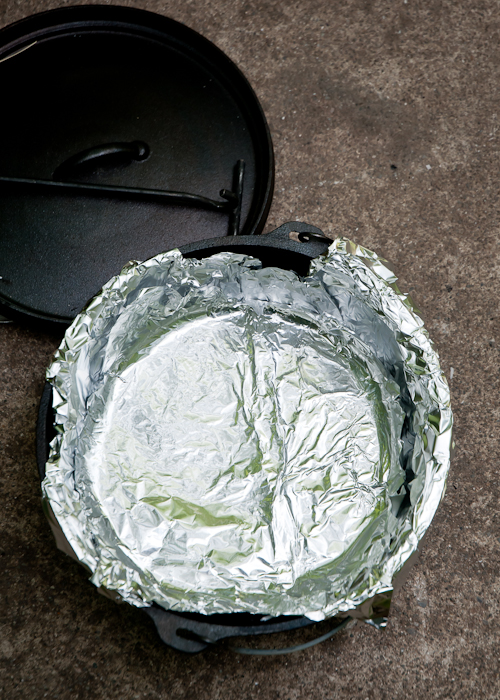
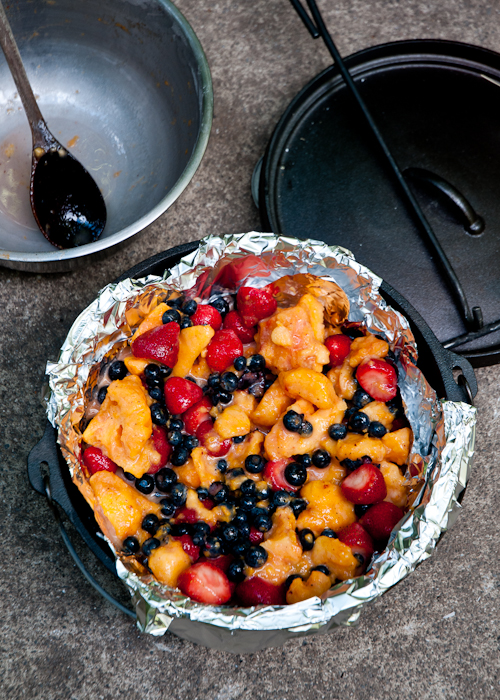
Secret #6: Do line the inside with foil if you need to. Need to = if you’re cooking something especially sticky like fruit cobbler. Or, if you’re using acidic ingredients like tomatoes, lemon juice, wine, or vinegar, because they can remove some of the seasoned interior. To be honest, I usually don’t use foil with the acidic ingredients, but I am careful not to let the food sit in the dutch oven for too long after it’s done cooking. Note: It will take a little longer to cook if you line it with foil.
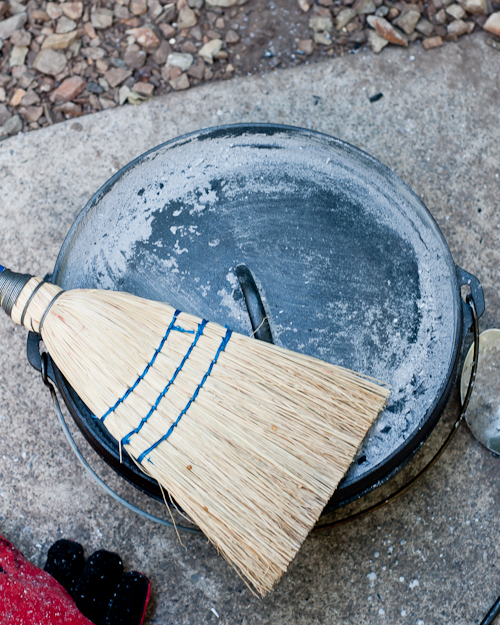
Some other quick Do not’s for Dutch oven cooking include Secret #7: Don’t ever pour cold water into a hot oven to cool it off, it will ruin it. Secret #8: Don’t drop it! They look indestructible, but they can break, or break your toe. : ) Secret #9: Make sure the lid is on properly and fits tightly so heat doesn’t escape. And don’t set the lid directly on the ground — use a pan, brick, or rock (I like using an upside down muffin tin) — it keeps dirt or other things from being transferred from the ground to your food. Secret #10: Don’t use plastic or silicone cooking utensils. Wood or metal only. Secret #11: When you’re finished cooking, do use the broom to clear the lids of ash so that it doesn’t get into the food.
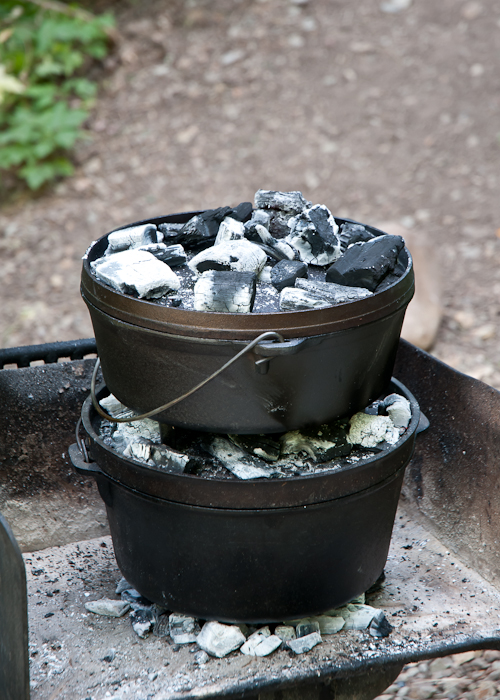
Secret #12: If you have more than one Dutch oven, you can stack them. The coals on top of the bottom oven become the bottom coals for the top oven. Know that this will require more time and you might have to add fresh coals to keep it cooking hot enough for both ovens.
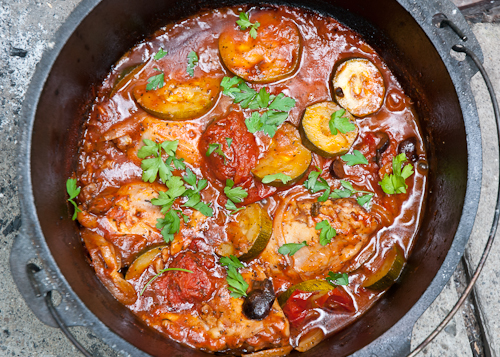
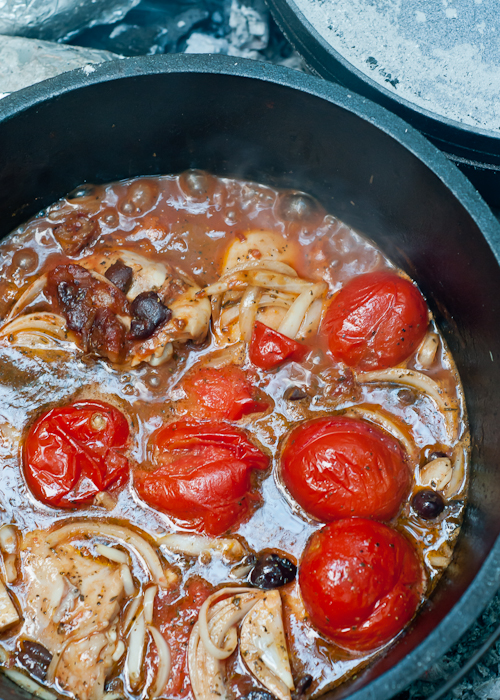
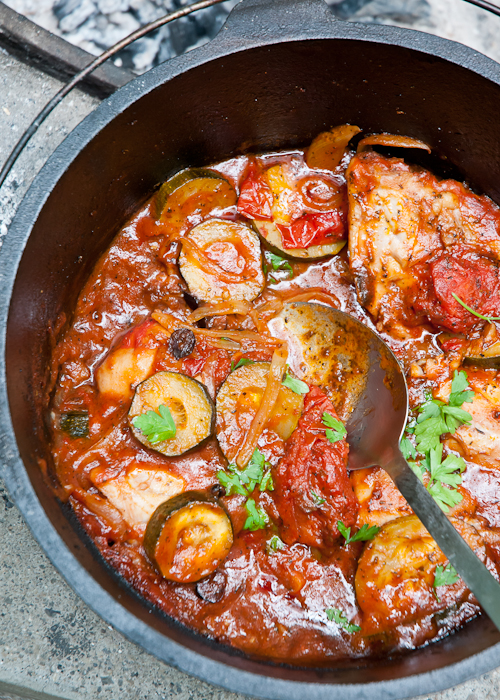
Secret #13: Timing depends on recipes, ingredients, and the size of the dutch oven. For example, with my Chicken Provencal stew (pictured in this post), I wanted to add some zucchini. Like with slow cookers, zucchini would disintegrate during a long cooking period. Add things that cook quickly near the end of cooking time. I added the zucchini about 30 minutes before the stew was ready. Start the ovens that takes the longest to cook first — desserts and ovens with just vegetables don’t take as long to cook. Also, you’ll need to add more time for deeper ovens.
Secret #14: As far as clean up goes, if the Dutch oven is well-seasoned, it will be a snap! It should just wipe out. (Toss any aluminum foil you might have used.) If the food was too messy to simply wipe out with a paper towel, use a little water or oil mixed with some salt. It will help scour the inside without damaging the seasoning. Let it dry thoroughly, then rub inside and out with oil.
Before we get to recipes, here’s one last rule of thumb I’ve found helpful, Secret #15:
If you can hear it, it’s hot enough.
If you can smell it, it’s probably getting close to being done.
DUTCH OVEN RECIPES
I chose one of my favorite recipes to turn into a Dutch oven recipe — this Chicken Provencal is amazing! We usually do it in the oven or slow cooker. Happily it’s even more delicious in the Dutch oven! Stews do really well in Dutch ovens. We also made a Summer Fruit Cobbler.
Dutch Oven Chicken Provencal Stew
adapted from Big Girls, Small Kitchen
For one 12-inch Dutch oven, to feed 6-8
Ingredients:
3 lbs. bone-in chicken thighs, skin removed (can use boneless)
1 large onion, thinly sliced
1/4 cup red or white wine vinegar
1/4 cup chicken stock or white wine
1 small can tomato paste
3 Tablespoons brown sugar
3 Tablespoons olive oil
3 Tablespoons minced fresh garlic
1/4-1/2 cup chopped, pitted kalamata olives
5 large pitted dates, chopped
2 Tablespoons fresh oregano (or 1-2 teaspoons dried)
Salt and pepper, to taste
2 zucchini cut into 1/2″ rounds
6 whole roma tomatoes
Fresh parsley, for garnish
Instructions:
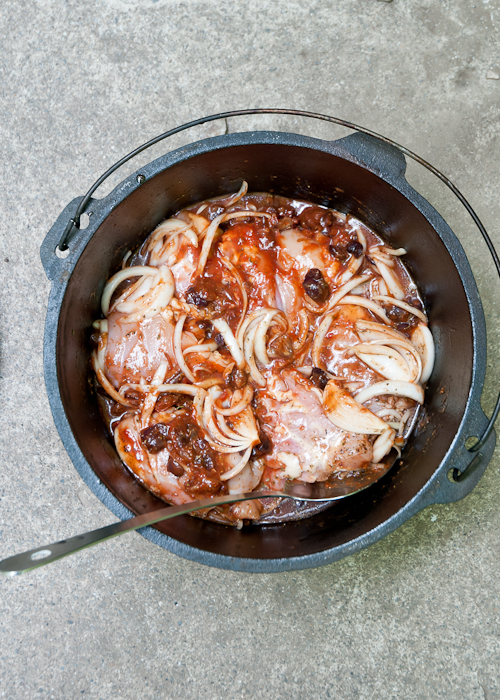
Combine all ingredients except zucchini and roma tomatoes in a gallon sized resealable plastic bag or large bowl covered with plastic wrap. Chill until ready to cook. (Can be done one day in advance.)
Rub the inside of the Dutch oven with oil. Place the entire contents of the bag or bowl into the oven. Arrange the chicken with a spoon or spatula so it is in an even layer. Place the Roma tomatoes evenly around. Place the lid on top.
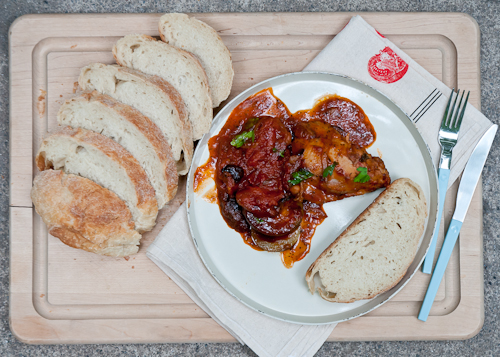
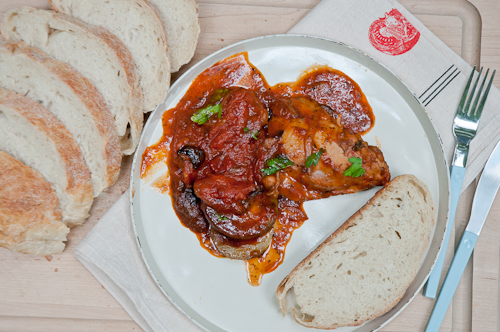
Place 8 coals under the oven and 14 coals on top. Cook for about two hours or until the sauce has thickened quite a bit and the chicken is falling away from the bone. Add the zucchini during the last 30 minutes of cooking time. Garnish with fresh parsley and serve with crusty bread, potatoes, rice or couscous.
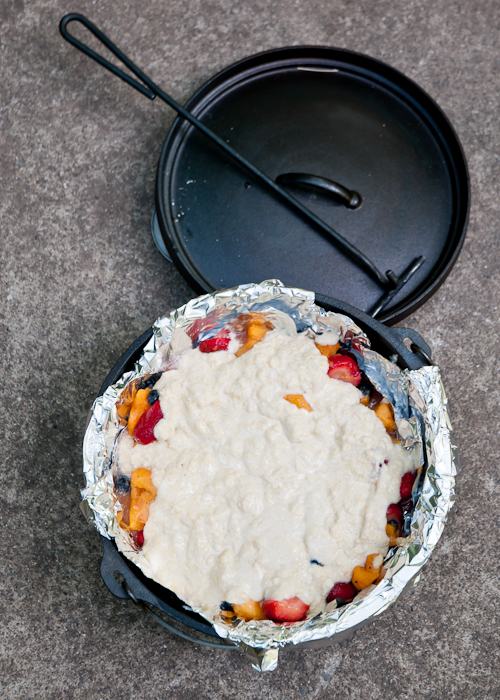
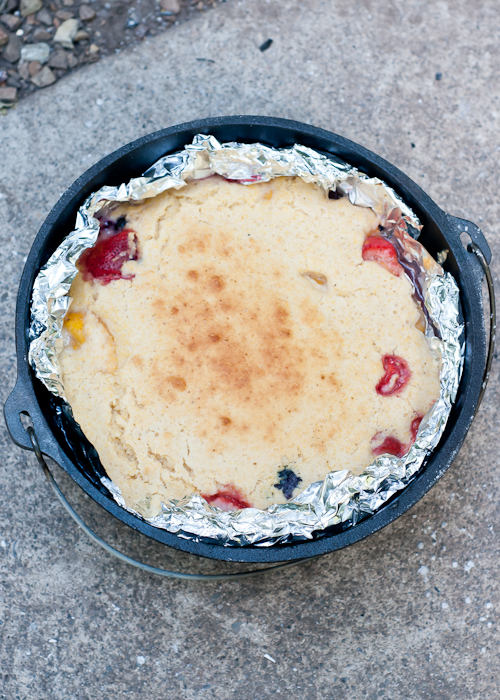
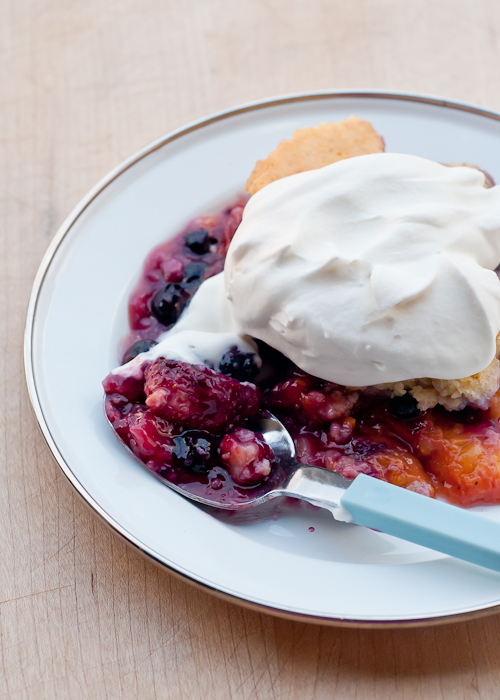
Dutch Oven Summer Fruit Cobbler
For shallow 12-inch Dutch oven, if using a deeper one, double the fruit and filling ingredients but keep the topping the same
Ingredients:
2-2 1/2 lbs. fresh or frozen peaches
4 cups fresh or frozen berries (I used strawberries and blueberries)
1 cup sugar (use a little less if your fruit is really sweet)
1/4 cup cornstarch
pinch salt
Topping:
1 1/2 cups all-purpose flour
1/2 cup stone ground corn meal (coarse or fine)
1/4 cup dry milk powder (omit if you use fresh milk instead of water)
2-4 Tablespoons sugar
1 Tablespoon baking powder
1/2 teaspoon salt
1 stick (8 Tablespoons) cold butter, cut into 8 pieces
1 1/2 cups cold water or milk (omit dry milk powder if using fresh milk)
Instructions:
For filling-
Mix cornstarch, sugar and salt together. Set aside until ready to assemble cobbler.
For topping-
Whisk all of the dry ingredients together. Add the cold butter and cut into the dry ingredients using a pastry cutter or your hands. The mixture will look like cornmeal with larger, pea-sized pieces of butter remaining. If making in advance, transfer to a large resealable plastic bag or cover bowl with plastic wrap. Chill until ready to make the batter.
To assemble:
For filling-
In a large bowl mix all of the fruit with the cornstarch and sugar. Let stand for a few minutes to allow sugar to dissolve. Transfer to the Dutch oven. (Can line with foil because it will be sticky!)
For topping-
Add the cold water or milk to the bag or bowl and mix just until combined. Pour over the fruit. Put lid on top and use 8 coals on bottom and 14 coals on top. Cook for about 30 minutes or until the juices are bubbling and the top is golden brown.
Serve warm with whipped cream or ice cream. Makes about 8-10 servings.
Have you ever cooked with a Dutch oven? Or eaten a Dutch oven meal? What’s your take? Do you think Dutch oven cooking worth the extra effort? And if you’re a Dutch oven expert, please add your secrets.
Here’s to outdoor cooking!
P.S. — Ultimate Guide to Cooking on the Grill.
Created by Lindsey Johnson for Design Mom.
If I were to make the chicken Provencal stew at home versus over a campfire, what is the recommended cooking temp and time ? I just got a dutch oven for my wedding shower and can’t wait to use it, and don’t want to wait for a camping trip :) Thanks!
Pingback: 15 Secrets to Dutch Oven Cooking - SHTF Preparedness
IF you putt cabig on the bottom rosts wont stick and the tast wil be no diferent.
Pingback: What Is The Best Dutch Oven For Camping | A Listly List
Pingback: Eco Snippets » 15 Secrets To Dutch Oven Cooking
Hey! You’re missing the whole amazing thing about a chimney starter! I’ve used charcoal chimneys for years because there never is a need for lighter fluid if you use them correctly. Stuff the bottom small chamber loosely with newspaper. Flip it over and fill the large chamber with charcoal. Light the paper underneath with a match and the paper will ignite the coals brilliantly. Hope this helps!
Thanks for the tutorial on the Dutch oven. I have one just like that and haven’t ever used it. I’m going to now!
To make cleanup easier, I always coat the outside of the oven with dishwashing detergent, like Dawn. You can also take a bar of soap & rub all over the outside before you fill the oven with food – it’s easier to do while the pot is empty.
Pingback: Blog Review: 15 Secrets to Dutch Oven Cooking | Texas Iron Chef
Do you think on can season it on the grill instead of oven? we don’t have an oven and I am considering to get a dutch oven instead for bread baking and cooking.
Yes you can, coat the entire pot in crisco or shortening (inside and out, the handle, everything). Then put your grill on low, and put in the dutch over and lid (upside down) for about an hour then shut it off, and let them cool completely before removing.
Pingback: Grill Chef - World Renowned Amateur
Pingback: Quick Dutch Oven Meal - Camping and Outdoor Life
Pingback: Dutch Oven Cooking 101 - Camping and Outdoor Life
People are criticizing you for using lighting fluid, but I dont think it makes a difference at all when cooking in a dutch oven . The reason for using the paper in the charcoal chimneys is to prevent fluid taste from getting into the coals and ultimately your food, but if your cooking on a cast iron pot with the lid on, its makes no difference how you start the coals, or even if your using regular campfire wood not meant for cooking or smoking because the smoke does not really infuse the food in a dutch oven like it would cooking on a grill or smoker.
I dont use paper myself either anymore, I use paper towels with a little bacon grease or vegetable oil. Works like a charm and not much paper flies up in the air with paper towels and the little bit of grease or oil helps accelerate it. I learned to do this after I had to light my chimney twice a few times when the paper did not start it on the first try.
I have had good and bad cooking experiences with dutch ovens. The roast beef with carrots, potatoes and onions up on Mt. Baker was perfect and equally yummy for breakfast the next day. The dutch oven heated to glowing by accident was not so good. The roast was charcoal a third of the way in and the carrots burst into flames when the lid was finally lifted. I never did get all the charcoal out of the bottom and it was lost in a hasty move a few years back. I have since replaced the dutch oven, but I have not been camping since.
Pingback: 15 Secrets to Dutch Oven Cooking - TinHatRanch
We started using a dutch oven a few years ago, and have had many delicious, successful meals from it. However, our last couple of trips, we,vet had trouble. We’ve been following the directions that came with our DO for the number of briquettes needed for our required temp. What should be done in 30 minutes isn’t ready after an hour. Or the top cooks, but not the bottom. Any ideas?
I’ve been cooking with dutch ovens for over 6 years now and one thing I’ve learned is that every dutch oven chef has his own techniques and they all work really well. I cook in my dutch ovens as often as I can, many times in my back yard. I even take them to college with me. By no means do I consider myself an expert but I feel dutch oven cooking is a lot of trial and error, and comes with lots of practice. This weekend I will be cooking a main dish for 300+ people. The only reason I feel confident in doing this is because I have done two trial runs of the dish I will be preparing and was able to work out the bugs before the event.
I thought you shouldn’t use any type of tomato base in any type of cast iron. I guess the acid from the tomato can release something from the Cast Iron and cause stomach problems.
I’ve cooked in Dutch ovens for many years when we camp every summer and when we have power outages. In fact, I used them more and more as the years went by, until now I rarely cook a meal when we’re camping without using one for something. I’ve made the usual soups, stews, casseroles, and cobblers, but I’ve taken it a step further with biscuits, muffins, and cherry chocolate cake. If you can cook something in your oven at home, then it can be adapted to a Dutch oven outdoors.
Pingback: Dutch Oven Summer Fruit Cobbler
Tried your Chicken Provencal over the weekend (annual Easter Weekend camping trip in the Eastern Utah Desert.) So delicious! Perhaps my favorite DO recipe to date! Subbed red wine for the vinegar and served with a big salad and side of barley; What amazing flavor! Thanks for sharing!
I have a Lodge 7 quart Dutch oven with a dome lid. Any tips
on using it with charcoal? Do you flip the lid over when using charcoal?
Of my 3 DOs , one has a flat bottom & dome lid…when i need to put coal on top I use foil to create a ridge along the top kinda like pie shields when baking a pie. works great & still can use the loop on top the top when cooking is done….
I’ve been cooking in Dutch Ovens/Cast iron for a couple of years now. Great article!
I learned years ago in Girl Scouts that each brigette is 22 degrees so if baking a cake or bread use however many coals you need to get the temp you want. Arrange them evenly using more on the bottom than top. I usually preheat when I am baking as well.
I light my D.O. with flint and steel or bow drill. I never use lighter fluid, instead use small pieces of wood. It will get the charcoal hot in minutes.
i do a lot of DO cooking both at home and in camp. Just a couple of points: I season with a high temperature oil such as peanut oil or,more recently, avocado oil. Rub a coat in the pan and lid, place in your oven at 350 for an hour, shut the oven off and let everything coo to room temperature. Secondly, I do a 10-12 pound turkey in a 16″ DO for Thanksgiving along with a deep fried turkey and a smoked turkey. I cut the turkey down the backbone and put it on top of several sliced onions in the DO, lay some celery and carrots around it, salt and pepper, a couple of sprigs of rosemary and thyme, a can of chicken stock and a can of white wine. Cook at 400 degrees until you get a nice brown, about 20 minutes. Lower the temperature to 350 and cook until tender.
This is making the Pinterest rounds and I love the tips. Would have never thought to have used a broom for the lid, but it is a great idea!
Nice except you do not know anything about charcoal. You talk about briquettes which is the correct type to use but, all the photos show you(?) using lump charcoal. You even try to call them “hardwood briquettes” no such thing.
Pingback: 15 Secrets to Dutch Oven Cooking | TVSLC.com
Thank you! Your simple, well-written tips have inspired me to get cooking. Heading out to buy some Lodge cast iron pans and Dutch ovens now.
What exactly are charcoal briquettes? Regular charcoal that you would buy for a grill? Sorry, newbie and clueless! Thanks!
Been Dutch Oven cooking for 10 plus years. We have used them to do everything from ribs to stew to mountain man breakfast and cobblers. When we do a cobbler in the 12 or 14 inch oven, we usually divide the oven with foil to make peach on one side and Cherry on the other. We’ve done Apple on one side with blueberries on the other. Use your imagination! Just gives a little more variety especially if we have kids in camp who favor one flavor over the other. Best advice for new Dutch Oven chefs…have patience and be imaginative!
Loved your article. One thing I do for any fruit cobbler is instead of mixing the topping wet, I take a dry boxed cake mix. Add the fruit on the bottom, sprinkle the cake mix over the fruit, and top with a few pats or slices of butter (about 1 pat every 3 to 4 inches apart. Trial and error, lol.). The fruit jucies mix with the cake mix and bake it, along with the butter. Easier to pack and make and it tastes fantastic. Also you can combine different flavors with the fruit to compliment the cobbler, such as a spice cake mix with apples, chocolate mix with cherries and white or yellow mix with mixed berries. Use your imagination, your taste buds will thank you.
I have a large Dutch oven I purchased in Idaho and have used it several times while camping with good results. Now, though, with just my hubby and me, the oven and recipes produce too much food, making it difficult to keep leftovers. It looks like I will need to find smaller ovens. I want to try the double “Dutch” (hehe) approach. Thank you for your tips!