By Gabrielle. Photos and styling by Amy Christie.
This is awesome! Awhile ago, there was a post here on Design Mom about how to dye eggs in a range of blues, using only cabbage. It was such a great post! Totally simple, totally doable, and filled with helpful information.


So I was chatting with Amy Christie, and we decided to continue the series! We’ve got red today, and two more colors to share over the next week or so. I know you’re going to love these posts — and the photos are so gorgeous!

Here’s what Amy says:
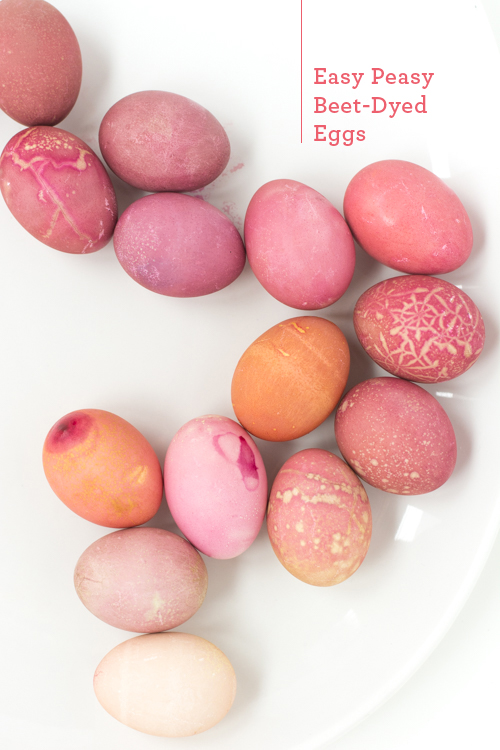
The post on blue-hue cabbage-dyed eggs from a few years ago is one of my favorite I’ve ever done. Colored eggs happen to be very photogenic. I still have all of them, minus the broken ones (I finally accepted that they would never be whole again). Now, working on the other colors of the rainbow, I am again blown away at their beauty. The hues are stunning and rich and the texture of each shell, unique. I wish I understood more about the chemistry of the egg shell to understand some of the textures and patina and spotting but since I don’t, I’ll just enjoy their beauty.


Ready to dye? Let’s get cracking.

Supplies:
– 6 medium beets
– 4 cups water
– 1 tablespoon white vinegar (extra to deepen color)
– eggs, emptied or hard-boiled
– large saucepan
– vegetable peeler, knife, slotted spoon/strainer
– cups (to dye the eggs in)
Begin by adding the water to the saucepan and bringing it to a boil. While the water is heating, peel and chop the beets into chunks. When the water is boiling, add the beats and the vinegar and simmer for 25-30 minutes. Remove the beets with a slotted spoon (or pour through a strainer), leaving just the dyed water.

Then dye the eggs!! Soak the eggs until they reach the desired hue. Our dye times ranged from 5 minutes to almost 24 hours; lighter colors, less time, deeper tones, more time. 30-40 minutes is a nice sweet spot. Remove the eggs and set in the egg carton to dry.
Note: We found rinsing the eggs after the dye bath really diminished the color so we recommend pulling the eggs from the dye and setting them on the carton to dry and letting the dye soak in. Also, this is a deep red dye so be careful not to spill on anything you don’t want to alter to a pink hue.

Here are other notes we took while dying things red to pink:
– We used the dye when it was still warm and when chill. If we had to pick, we thought the slightly warm dye worked faster but maybe it’s just because we were so excited about it.
– With how lovely and dark the beets are, we were a little disappointed with how deep the tone of the red became. It didn’t really intensify any more after 30 minutes of dying, even when left overnight. We did add a splash more vinegar to the dye and it helped deepen the color a little. (That complaint aside, we love the tones we did get.)
– To get an orange-red, first dye the egg in the turmeric natural dye, then add it to the red.
– To get a purple-red, dye the egg first in red, then add it to the . Make sure you have a strong red before adding it to the blue, as the blue can easily overpower the other dyes.
– For an even deeper purple, we dyed the eggs in the red, then the blue, then the red once more to really give the color a push.
– In order to dye the eggs overnight, we put the dye in disposable cups (inside of a plastic container) to avoid staining our own.
– If your eggs are hollow, you will have to use something to weigh it down. We suggest using another disposable cup with a little bit of water in it and setting it down on top of the hollowed egg. If your eggs hard-boiled, they’ll sink by themselves.
– If you are using hard-boiled eggs, unintentional (or intentional) cracks add to the beauty. And don’t worry about the dye getting inside (because it will), it’s natural!


__
Aren’t these gorgeous! Thank you so much for the fabulous photos, and for all your notes, Amy. I can’t wait to try this! How about you, Dear Readers — have you ever tried dyeing eggs using foods or plants? Any luck getting a really deep red? Last year, I heard that yellow onion skins will make a red dye, but when I tried it, it was more of a brownish-red. How about you?
P.S. — More Easter posts here. Also, more dye posts too! Blue, Green, Orange, Yellow.
Credits: Images, styling & text by Amy Christie.
Gorgeous!!
Question! Have you tried boiling the eggs while boiling the beets? Wondering if it’ll make the colour nicer? I wanted to try it but wasn’t sure
Fun and beautiful! I don’t see the recipe for the turmeric dye. Can you link to it?
These are so incredibly beautiful! I love the natural, simplistic nature of these. Can’t wait to try them! And the blue:)
These look beautiful! I have never really tried dying eggs and I would never have thought of dying eggs naturally, I must give this a go!
Holly X
In Estonia it is traditional to dye eggs with onion skins, the result will be marbelized brown (with lighter and darker brown areas). Sometimes we add colour with yarns – you have to wrap them around egg, then onion skins and then some cloth. And then we wrap some strings around the cloth to keep it in place. You can get marbelized effect only with wrapping. When you google “sibulakoortega munade värvimine” and look at pictures you see some color and wrapping pictures.
Last year I tried dying with blueberries and used similar wrapping technique. Loved the spotty result!
I don’t eat hard boiled eggs, and I don’t mind risking a few broken eggs since we wouldn’t be eating them if they were hard boiled anyways, so we dye our eggs raw/uncooked and then just put them back in the box to be used later for scrambled eggs or baking! Makes baking a little more beautiful when you get to use coloured egg (shells)!
When I was growing up my mom always made onion skin eggs and lately I’ve been making the blue ones with from red cabbage. I have’t tried beets before though. One suggestion. To get a darker and more even dye try starting with raw eggs and boiling them in dye. Sometimes I will then leave the eggs in the cooled down dye water overnight after boiling (especially for the red cabbage/blue eggs because the dye isn’t as strong as onion skin dye). I also like taking leaves or flowers and pressing them on the egg and the wrapping the egg in pantyhose and tying with a string before boiling in the dye water to get interesting batik-like designs.
Great idea, Christine! Dying them while hard boiling them. I wonder what tones would result!
Love the idea of this! All natural and beautiful.
I love finding fun and natural ways to dye eggs! These are so fun and they look lovely! Thanks for sharing!
Paige
http://thehappyflammily.com
Hi, I tried this craft activity at my Aged Care Facility (I’m the Activities officer) and the dyed red colour was not very dark. Could it have something to do with the eggs? They are light brown/nude colour. I followed your instructions accurately, but would like to have another try.
Cheers
Karen
Newcastle,NSW
This has been such a great series! I’m so appreciative that I mostly have these things in my pantry, and can’t wait to try all the colors with my son this weekend. :-)
Pingback: Simple family traditions to create wonderful Easter – Kristina Stuke
Pingback: How to Dye Easter Eggs Naturally – Bainbridge Today
Pingback: 15+ Unique Ways To Decorate Easter Eggs - Lattes, Lilacs, & Lullabies
A couple things I’ve experienced with natural-dyed eggs:
1) Beet dye fades to a tan color– a fairly beautiful neutral buff, actually– even if you seal the dried blown egg with spray-paint and keep it out of the sun. The process happens quickly–often too quickly to dry the egg, blow it and seal it (or seal it and blow it, I’ve tried both). If anyone knows of a way to retain reds and pinks with beet dye on eggs for longer than a couple days I’d love to hear it.
2) If doing botanical imprints, turmeric powder tends to stick in the fabric used to bind leaves and flowers down. This interferes with the uptake of other dyes if you’re going for a two-step green, orange, etc. while keeping that nice clear imprint all the way through to the end (You could try removing the binding for the second dye, but in my experience the imprint ends up less distinct and complex– less contrast, but I think the second dye also causes the outlines to bleed in). I like to use cheesecloth for the sketchy crosshatch effect, but the turmeric conundrum holds true for nylon stockings as well. This year I’m going to try a one-step green using coltsfoot, so wish me luck :)