
I’m so excited to share this DIY with you today. It is sooo fun and sooo easy! I’m placing bets it’s going to be your new favorite project to try with yours kids. All you need is rubbing alcohol and Sharpie markers. For reals!
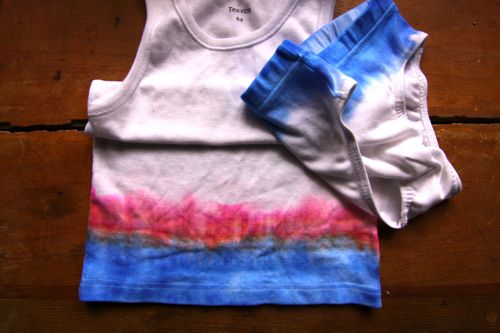
Maude used the technique to make underwear sets for her brothers and sisters as Christmas gifts and they turned out great! (Side note: we’ve done t-shirts a few times over the years, so we thought underwear would make a nice variation. : )


1) Start with Sharpies, rubbing alcohol (the bottle pictures is French, so it’s spelled differently), and a piece of clothing. If you’re not interested to underwear, the same technique would be great for t-shirts or bandanas or tote bags, pillow covers, or pretty much any cotton item.

2) Protect your work surface with an old or dark towel. Use the markers to scribble on any design you like.

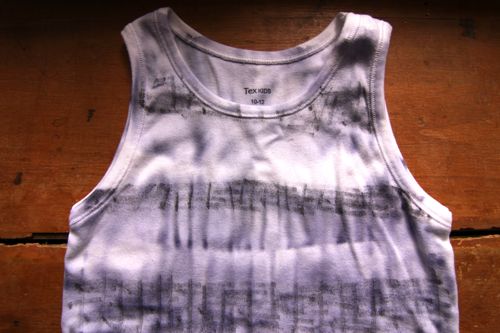
3) For this undershirt, we wanted the tie-dye effect to show up on both the front and back. To make sure we were making the same pattern in the same place, we folded the shirt over and continued drawing on the back.

4) Once you’re done scribbling, it’s time to add the alcohol. Our bottle has a drip lid, but if yours doesn’t, use an eye dropper.

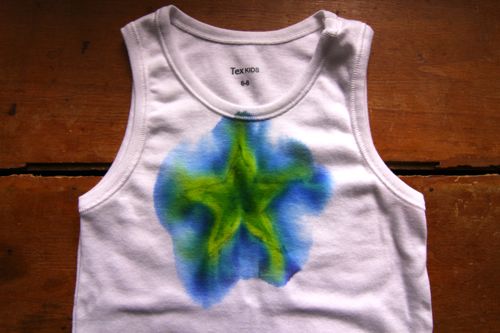
5) Drip alcohol on slowly at the edges of your scribbles. Then watch as the colors smear and shift across the shirt. In the photo above, the alcohol has been applied to about half of the scribbled area.

6)Let the alcohol fully dry — this step is important because alcohol is flammable — and then set the color by running it through your dryer.
7) Experiment! If you want more smear, use more alcohol. I was generous on the alcohol with this particular tank top, and the design ended up like this:

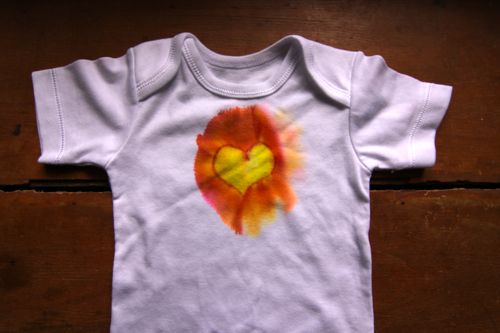
8) One last note. If you want the design to just be on the front (like the heart and star above), put a plastic grocery bag inside the shirt so the alcohol and marker won’t bleed through to the back.
And that’s it. It’s so fast and easy — and incredibly fun. You really can’t go wrong. I’d recommend watching for bargains on pale or white tees, boxers, undershirts, etc. and keep them on hand for rainy day projects. These would also be really fun to make at a birthday party!
By the way, I learned this brilliant technique from clever Erin Loechner. She used it to give new life to cloth napkins.
Awesome! and less messy than Tie Dye. I am trying this with my kiddos!!!
I’m sure they’ll love it, Amyks. The options are endless!
We’ve done this in circles for baby swaddle blankets and 4th of July shirts – they turn out gorgeous!
Very cool project- we used fabric paint to make some tea towels and pillow cases last week-
http://ladyofthearts.blogspot.com/2011/12/diy-holiday-gift-ideas-under-five.html
I love the tie dyed effect these have without the huge mess of it
How fun, Ren! Thanks for the link.
Great idea! What are the care instructions for the pieces after you’ve done this?
Good question, Colleen! I haven’t washed this particular batch because they’re being wrapped up for Christmas, but I know when we’ve had Sharpie on other clothes it remains through wash after wash. I suppose it depends on the piece of clothing…
One time my daughter drew a kitty on her t-shirt with a sharpie and it stunk for so long that we finally had to get rid of it (even after washing). I couldn’t handle that chemically smell. How do you keep from this? Does the alcohol help?
Hmmm. I didn’t notice a smell at all. Maybe the alcohol counteracts it. Or maybe my nose isn’t very sensitive. : )
What a great project to do with the kids,…..and myself! A lot less messy than the “real” tie dye method too.
It is soooo good for kids!
Thanks for the awesome tutorial. do you think this will work with synthetic materials, like rayon and such?
OMG – I seriously can’t WAIT to do this. I used to tie dye onesies for my boys but it was really time consuming – this sounds perfect! Thanks!
xo
cortnie
This is so great…i just picked up a very large set of sharpies for one of my kids presents for our advent calendar…I do love those sharpies! You always have the best projects!
annie
I can’t even get over how awesome this is!!! The uses for it are endless! Thank you SO much!!
That’s how I feel, Sara! : )
Thank you so much for this. My daughter will love this project. Who knew?
excellent craft!! definitely will try this out!
We are so totally doing this!!!!
I’m not exactly sure what chemicals go into the ink for sharpies but it may not be recommended to put it in contact with a child’s skin for a whole day, especially their private parts. This looks like a fun and easy craft project though, and I don’t like to rain on any parade, but I thought I’d put that concern out there.
I would not worry about this once it is washed. It is just like any other colored piece of cloth.
these are looking awesome
Great tie-dye effect! Love this new technique
I”m totally doing this for a gift from the kids to each other.
we’re doing plenty of ‘handmade holiday’ this year. I just made superhero capes for them and I embellished t-shirts as well. this will be a great addition to the holiday
I was just searching your site yesterday for something my 4-year-old and I can do together for my husband’s gift. This is perfect. She will be thrilled to be able to use Sharpies. Thank you!
So glad to hear it, Jen! Have fun.
This is so clever and simple. I have a big box of colored sharpies. I’m packing them in the suitcase right now to bring back to the hospital. My daughter will love this – thanks for another idea to keep us busy!
Do the colors tend to run in the wash?
Hi Alana! Wait for the alcohol to dry completely, then “set” the color by running the clothing through the dryer. Once you’ve done that, the colors won’t run — or even fade much at all.
we did this at girl scout’s encampment when i was 8 years old–i’m 25 now, and it made me smile to see. i remember designing a bandana and using it as a sling (for my pretend broken arm, of course). :) i’m not sure my memories are reliable, but we used cotton, the colors didn’t fade anymore than a tiedye shirt would, and i don’t think the smell lasted.
What a sweet idea. My ten yr. old daughter would love to make these. Looks like this will be another pin on my diy board at pinterest. Thanks!
This just blew my mind!!! Pinned the heck out of it so I don’t forget about it for the future. :)
this is adorable!! what a brilliant idea.
OK, this is nothing short of brilliant in its ease and beauty. I cannot WAIT to do this! Thanks so much – as always, you find the most amazing things :)
thanks so much for the idea! i had tote bags just waiting for the right project. Just finished two of them with my son using this technique. He had fun, and they look great!
So, we made several of these t-shirts this weekend, some turned out better than others. We found that certain colors took to the process better than others, and that thicker blocks of color were better than the skinner lines. All in all, we had lots of fun thanks for the inspiration!!!
but what if you don’t have a dryer? how do you fixate color then?
I bet you could do it with a hair dryer….just don’t hold it too long in one or too close or it will burn it.
Iron it. You can also lay a piece of wax paper over the project and iron over that. You can even do this on the wrong side as well as the right side and let the wax soak into the fabric fibers completely. This does stay forever. Note. You could let your little ones that you are nor ready to use markers color their shirts with crayons and again, cover with wax paper and press to set the art work.
Hi,
Is there anything other than rubber alcohol that I can use?
We made sharpie firework shirts a couple years back. SO much fun and so easy too!!
I’m going to try this on prefolded cloth diapers for burp rags. Imagine all the different designs/monograms you could do.
I just kind of stumbled onto your site while searching for projects to do with my 9 year old son. He is in the children’s hospital for cancer treatments. Even though we expect this to be a short stay, I spend my nights searching for projects he can do while confined to his room and iv pole. Thanks for taking the time to put this information out for people like us!