Note from Design Mom: I asked Kate of Mini Eco to create a Back to School themed project for us to try. I think making beads out of colored pencils is brilliant! Wouldn’t these beads be fun for your elementary school-ers to string for a class project? It would also be a fun activity at an art-themed birthday party. Here’s Kate:
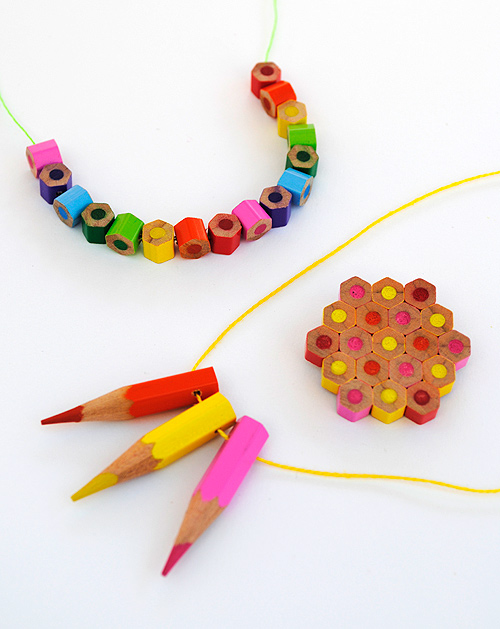
Lately I have become a little addicted to making (and wearing) colored pencil jewelry. The items pictured are really easy to make and only require a few basic tools. You don’t even need to buy any materials, simply chop a few centimeters from the end of your kids crayons…if you do this neatly then they will be none the wiser!!
I think the results look great and you, or your child, will definitely stand out from the crowd wearing them!
You will need
- Colored Pencils
- Junior hacksaw
- Fine sandpaper
- Drill and small drill bit
- Thread (for the necklace)
- Superglue (for the brooch and earrings)
- Brooch back (for the brooch)
How to: Basic Bead Necklace
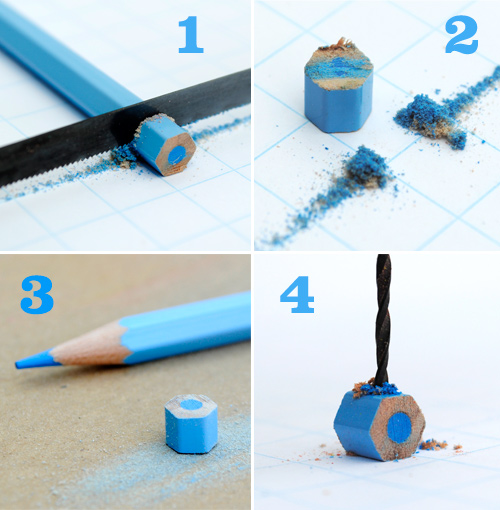
1. For the basic necklace you will need to begin by making your beads. You can use either hexagonal or round crayons. The beads I cut were 7mm long. To cut your beads use a small, sharp, hacksaw blade. (In the UK you can pick up a junior hacksaw for a pound or two in most hardware shops). Take your time when cutting the crayons and try not to apply too much pressure…that way you are less likely to chip the paint off the outside.
2 & 3. Don’t worry if the cut surface of your beads look a bit scruffy…all they need is a quick rub with some sandpaper. I found it easier to lay the sandpaper on a flat surface and rub the bead along it.
4. Now drill a hole in the side of each bead using a small drill bit. Make sure you place a scrap piece of wood underneath. It’s not a good idea to get holes in the kitchen table!
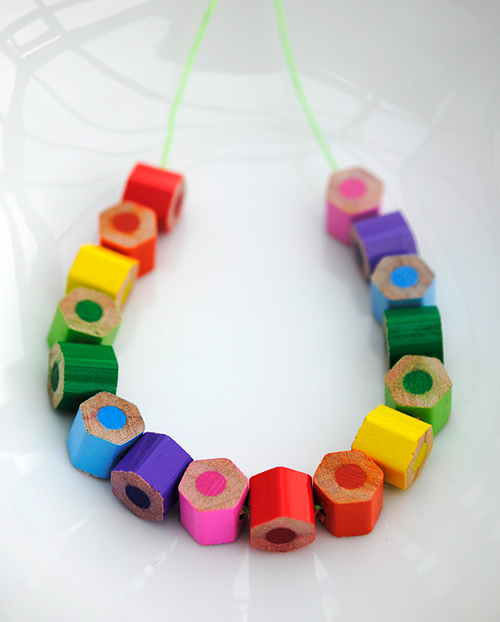
Once you have cut a number of beads simply string them onto a length of thread…job done!
Tip: These little beads are also make lovely bracelets. If bright colours aren’t your thing then try some more subdued shades. White colored pencil beads look especially nice.
How to: Pointy Necklace
1. Begin by sharpening your colored pencil, then cut the end off as before. My beads measured about 3.5cm in length.
2. Drill a small hole through the end of your beads
3. String the beads onto some thread. You can add some co-ordinating beads if you wish.
How to: Brooch
If you fancy a bit more of a challenge then why not have a go at making the colored pencil brooch?
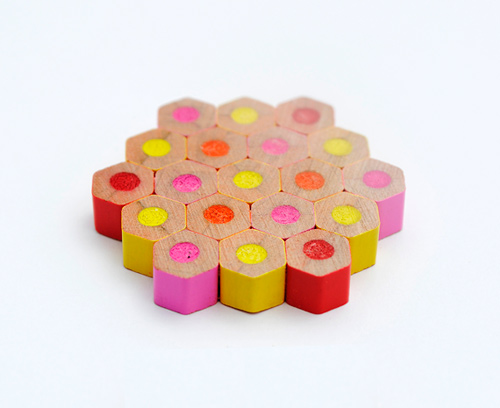
1. You will need to use hexagonal pencils for the brooch. Cut your beads as before. Mine were 6mm in length. You need 19 beads to make the brooch pictured.
2. Put some sandpaper on a flat surface and sand the beads so they are nice and smooth.
3. Work out how you want the beads to be arranged before you being gluing. Once you have decided simply start sticking the beads together using superglue.
4. Once your beads are all stuck together sand the underside of the brooch until it is flat and smooth.
5. Superglue a ‘brooch-back’ to the back of the brooch.
Tip: The best way to avoid making a wonky brooch is to assemble it on a flat surface. The underside of the brooch will be the most even so make sure this becomes the front of the brooch.
Make sure you only use the tiniest dab of superglue on each bead….and don’t stick your fingers together! I have done this before and was reminded how powerful superglue is!
Finally, remember these necklaces are not recommended for under three’s. I would also avoid making the pointy bead necklace for any child…for obvious reasons.


Too cute! What fun project. If only I had a drill…
I love this….I hope to work on it this Summer and make A LANYARD for my school id…I think a tiny bit of clear nail polish on the ends would keep the colors from smearing on my clothes….I’ll try to send you a picture when I get it made…wish me luck!
Wow its so cute! :*
i would be happier if these were fixed by a harmless varnish or glaze because if you sweat the colour may mark skin, bleed or get on your clothes
That’s so cool! I may have to give this one a try.
this is so cool and pretty- My ten year old wants to try this!
how fun!
oh my this is adorable!! my niece is obsessed with crayons and colors at the moment ~ so i may just have to make her one! thank you ;)
xx ~ ks
This is really unique and cool! And think of the different color combos and options… it would be so stylish in an all neutral pallet.
er… palette ;)
Oh! That would be gorgeous.
What a great way to recycle the ends of colored pencils once they get down to nibs to small to sharpen! I would’ve been pumped to wear that as a kid (or if I were a teacher!)
I LOVE this! Will definetely be trying this one.
So pretty – I love everything Kate makes! I can imagine a really cool red pencil heart-shaped brooch for Valentines.
How cute! What a great way to recycle old colored pencils. Most of us probably have a bag of these in our house just waiting for a new life.
love this idea, but i think i’d skip the pointed one…they seem a little unsafe to me.
Fun. I didn’t even think of the pointed ones being unsafe (as Diane suggested) but I did picture the leads breaking and the pieces being too short to sharpen. But they’d be pretty while they lasted. (I also wondered about the necklace getting colors on clothes, but decided it probably wouldn’t be a problem. Or you could seal the beads before using them.)
I would really be concerned about color transfer to clothes without sealing w/lacquer or shellac or something. Looks great, tho.
I absolutely adore this project and can’t wait to try it with my kiddos! My creative wheels are going haywire with all the possibilities! Thanks for sharing!
What an adorable idea. Wouldn’t it be fun to adapt it to make holiday ornaments? What a nice present for a teacher that would make.
Wow. This is so beautiful. I love this–thank you for sharing!
I think the colored pencil beads would look even better and more like real jewelry if suspended from a fine necklace chain (maybe in a copper or silver color).
I really love that idea. Sort of a high + low combo. Very cool.
These are adorable!
What a neat idea! I’m starting my Bachelor of Education program soon and will be specializing in Elementary education. I think this necklace would look so cute on an Elementary teacher! The kids would love it!
What a cute idea…for adults, too!
Hi Rebecca….yep, I wear mine more than the kids do!!
Such a sweet little idea! If only I trusted myself not to drill a finger off :P
How neat! I want one of them. Definitely will add this to one of my projects. Thanks for sharing
I love this and was thinking how fun it would be… and then I was at the Dollar Tree today picking up some craft supplies for a project my kids and I are doing and they had the hexagonal colored pencils in bold colors!!! $1.00! Perhaps the least expensive FUN jewelry of all time if I can figure out how to use that drill!!! YAY! THANKS!
Go for it, Diane! Once you master the drill, a whole new world of projects will open up. : )
Do you remember which dollar store you found hexagon shaped pencils at? I’m in northern Virginia and haven’t been successful yet. Thanks!
Just posted this to Pinterest — love!
Too Cute!
Wow, those are fun! …. fantabulous!!
I would love to make one of these for my grandma…do you know if the pencil color rubs off on clothes?
Good question, Lou. I don’t know the answer. But if you’re worried, I’ll bet coating the ends with clear acrylic paint (or nail polish) would do the trick.
Hi Lou…I’ve not had any problems with color staining but if you are wearing your best white blouse then maybe a layer of clear nail varnish or mod podge wouldn’t go amiss
Mod Podge would work on the pieces to set them and make sure the colors don’t get on clothes or skin. :)
Well, I just found my “teacher Christmas gift”. Thank you!!
Wow! A lovely idea, so simple and so unique! I am a teacher and plan to do this with the kids!
I am going to start with marking the beads, drilling and then cutting off the beads. I’m not a great driller, so it seems safer for me this way.
That seems so smart, Lilli! Great idea.
Incredible and fantastic! Thanks for this idea.
Does anyone sell the cut pencils already? So cute.
Hey etsy-ers? You up for it? : )
Hi Susan,
Do check out etsy…I’ve seen a few people that sell crayon jewelry…you might be able to buy the ready cut beads from them.
I see using lots of them and making a trivet.
thanks
I would think you could use clear nail polish to help keep the “color” of clothes
This is awesome! I can’t wait to try it!
One thing I thought of: it would probably be considerably easier (and safer!) to drill the hole BEFORE chopping the piece off the end of the pencil :) just a thought!
Hi Samatha…that sounds like a good idea…I never thought of it!! Do allow for an extra millimeter or two when marking out because you do lose a little when sanding.
Love this idea! Just featured on Sew Dang Cute:
http://www.sewdangcutecrafts.com/2011/08/fab-five-7.html
I love these, I’ve sent the link to a friend to have a go!
this is so adorable! :) i love the necklace idea!
How cool is that? I have some pastel Pencils I’m going to try with this method.I love repurposing. You have a great imagination and a good eye for colors. Thanks
Love the cool colorful idea..you have done it smartly!
Thanks for sharing with us!!
Love these! The brooch especially. So fun!
awesome idea! so pretty!
Very cute – and clever!
Wonderful tutorial, Kate! Love your blog, Gabrielle.
Alas, our dollar tree didn’t have hex colored pencils. After an exhaustive online search, I found a lot of $$ artist-grade hex pencils, and one more affordable brand: Pentel. A 24 pack can be included with your next book purchase on Amazon for $4.99.
Hi! Love the project and attempted this weekend. However, I got stuck at the drilling stage. I couldn’t figure out a way to keep the bead still while I drilled (the pencils were round). Does anyone have any tips to keeping round beads still while you drill? Is it easier with hexagon pencils? I tried setting the bead in play dough but had not luck.
Thanks!
hello~!
i have a suggestion for your for the round beads… i haven’t tried this myself, but i have an idea as to what you could try doing. firstly, don’t cut the pencils into beads yet, it’s much safer to drill while the pencil is long (so you have more to hold onto). then, mark out where you want the hole to be, and take a nail and carefully press it into the pencil to make an indent. (that’s what i usually do in tech class to make sure the drill bit drills on point) then hold tight and drill carefully into the pencil..
hope that helps!
We made colored pencil “value necklaces” for Young Women’s tonight thanks to your great idea. They turned out so cute and the girls loved them!
I featured this tutorial on my blog here-
http://punkprojects.blogspot.com/2011/10/return-of-make-it-monday.html
-Katie
this is such a cute and inexpensive idea! it’s awesome. but i just have a suggestion, i think it would be safer and also more accurate if you drills the holes before cutting the pencils into bead size. that way, you have more of the pencil to hold onto, reducing the risk of slipping and injuring yourself/others, and also, reducing the chance of mis-drilling :)
What a great idea for gifts/stocking stuffers at Christmas or even in a gift bag at Birthday parties. I am a homeschool momma and I do believe I am going to try it on my own first (hide out in my room and try to keep the noise of the drill down-shouldn’t be hard over the noise of the TV or video games) then figure out how to present it to my son and get him to try it out. I feel a crafty kind of day coming on and gonna have some stocking stuffers to boot when we’re done. I can find some colored pencils at the $ store or at one of the discount stores nearby and have a lot of fun. Come to think of it, we may already have enough extra one at home that are kind of wore down to try out first before buying any. OOOHHH! I can’t hardly wait to get started.
This is such a cute gift idea and to be able to use those old colored pencils without buying new ones makes this project a hit in my house! I can’t see the sharpened ends being unsafe for an older girl. If the ends got broken, well, that’s par for the course with those pencils. It’d just have a new look. lol I might actually drill the holes, put the beads in gift sacks for the girls to make their own necklace. Keep up the good work!
I’m another one who hoards pencil stubs in the hope of finding something useful to make out of them. I love the idea of turning them into beads, even though I’m rubbish with a saw and drill! They’d also look good decorating a box or arranged into a mosaic picture.