Our son Ralph created great-looking bleached out tees for his siblings — each one unique and representing something he thought each individual sibling would love. They turned out super cool. And I’ve got the images and techniques ready to share. Find the full DIY below.

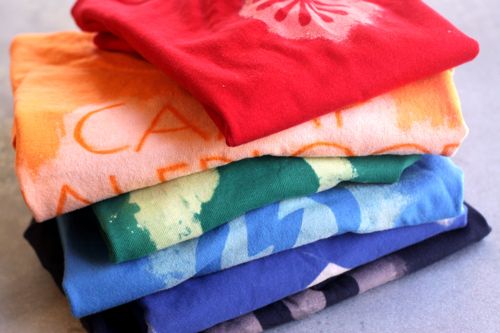
Here are the designs Ralph created — there’s a wide variety and they will give you lots of inspiration and ideas. For Betty, Ralph chose a simplified flower. Cute!

This one’s for Maude. In case you’re wondering, orange Camp Halfblood t-shirts are a major part of the Percy Jackson book series. : ) Ralph made a second one for Maude’s best friend. Maude is going to go nuts over these.

Olive’s favorite color is green and her favorite fruit is a pear.

Ralph made a t-shirt for himself too. He is really into skate brands at the moment, so he recreated the Electric logo.

For Oscar, Ralph used duct tape. Ralph’s happiest about how this one turned out.

J is for June, of course.
Ready to make your own? Let’s get started.
Gather Your Materials
– 100% cotton t-shirt in a bright or dark color (you can use a pastel, but the contrast from the bleach won’t be as intense)
– Bleach
– Rags
– Sticky vinyl to create your designs and block the bleach — we also use duct tape as bleach blocker on one of the t-shirts

Step One: Set Up Your Tee
Spread out the t-shirt, then put a layer of rags or an old towel between the front and back — so the bleach doesn’t bleed through to the back of the shirt.


Step Two: Apply Your Design
Apply the design you want on your t-shirt. For most of our designs, we used sticky-back vinyl that was cut into shapes and letters using a shape cutter — perfect for a Silhouette machine or a Cricut machine.
If you don’t have a shape-cutting machine, you could still buy a sheet or roll of sticky-back vinyl and cut out the shapes you want by hand.
For Oscar’s tee, Ralph put strips of duct tape across the shirt in a diagonal pattern.


Step Three: Add The Bleach
Next, pour some bleach into a container and dip an old rag into the bleach. Press the rag onto and around the vinyl or tape.
When the shirt is as bleached as you’d like it to be, put your hand into the tee and lift the front of the shirt, slip out the rags and immediately rinse the front of the shirt in water to stop the bleaching process.
Be careful not to let the bleached area touch the not-bleached areas until the bleach is rinsed out.


Step Four: Let The Shirt Dry
Dry the shirt in the dryer, or air dry it, and you’re ready to wrap it up. Yay!
(Find a few more troubleshooting tips at the bottom.)


Some helpful tips:
– If the bleach doesn’t seem to be working, there is probably sizing (a chemical often found on new clothes) on the t-shirt fabric. Just wash and dry the shirt and try again. This happened to me twice and washing the shirt did the trick.
– Wider pieces of vinyl seemed to work better than thin pieces. For example, the lettering on the Camp Halfblood t-shirt was super thin and the bleach crept behind the letters. We used an orange fabric marker to correct any over-bleaching. The camp tee was the only design where this happened.
– For the pear we used a sponge brush instead of the rag. The rag makes for cleaner edges around the design. The brush made fuzzy edges. Both can be cool depending on what you’re looking for.
– You’ll probably get a few random dots of bleach on the shirt in places you weren’t planning. Don’t stress. It will look good anyway. : )
P.S. — Make sun-dye bandanas.