Welcome Spring! The daffodils are blooming along the highway, cherry blossom buds are beginning to pop up along the branches, and the sunshine gets a little earlier, brighter, and warmer every day. This little row of felted spring chicks is sure to be one of your very favorite home decorations.
These birds are so fun and simple to make, once you get the hang of it, you can make about forty in an hour or so. Make a few for everyone you know — they are perfect decorations for spring and Easter! And you can leave them perched in your home year-round to make you smile. Now, let’s get started!


Before you begin, you’ll need to gather up some supplies (all of these, excepting the kitchen knife, can be found online or at any craft store):
–wool felting tool with several needles
–wool roving in the color of your choice, and contrasting color for the beak
–2″ foam balls
–felting mat (If you don’t have a mat, you can use a hunk of upholstery foam as pictured above)
–sharp kitchen knife
–glue with a precision head
–two beads

First, cut one edge off of the ball. This allows the bird to sit flat, and also provides him a head!

See how cute he is already?

Next, spread a thin layer of your wool roving across your mat or foam. Spread another layer, fibers perpendicular to the first, on top of it.

Then, spread one more thin layer of roving, fibers perpendicular again. The cross, hatch pattern allows the wool to matt better. Not sure what this means? Read on, you’ll get it soon!

Using your felting tool, pierce the layers of wool repeatedly. Don’t get your finger, those needles have barbs! The more you pierce and poke, the more matted and intertwined the wool becomes. After a couple minutes, you should have a pretty well flattened rectangle of felt.

Peel the felt off your mat, and lay it over your foam ball, head and all. The head doesn’t need to be attached with anything, because we are going to hold it in place with the wool itself. (Don’t try and glue it — it will just gum up the needles, and won’t hold it any more effectively.)

Wrap the felt all the way around the bird body, tugging it a little in places to allow full coverage. It’s no biggie if you have a thin spot or two, you’ll learn how to cover those up soon.

Now you get to go to work felting the wool right onto the styrofoam. Don’t get your finger, those needles have barbs!

The more you pierce and poke, the more matted and tight the felt will become. It’s a pretty cool process, and you may get some satisfaction out of having very tightly felted birds.

Do a little examination of your bird. Any little spots where the foam shows through, you can simply felt over with a small little bit of roving. Make sure you separate it a little bit, and cross the fibers before laying it down, so it felts nicely.

Watch out! Those needles have barbs on them!

Ahh, beautiful.

Now that the body is covered well with felt, it’s time to make a tail and beak for the little fella.

Begin with the same process, just a lot less wool. It’s not an exact science, so start with a smaller amount than you think you’ll need and add roving as you go.

This time, you’re actually creating the tail shape as we felt by folding in the edges, so that the wool begins to form a felted triangle. This is where you can allow your creative juices to flow, and make whatever size, shape and color of tail feathers you can imagine!

You are done when the shape you’ve got looks good to you.

Next, use your beak roving to do the same thing, even smaller, for the chick’s beak. It doesn’t have to be a perfect triangle, or a triangle at all!

Here are the tail and beak ready to be felted onto the bird’s body.

Use the very same technique — place the felt where you want it and pierce and poke with the tool until the tip of the tail is felted completely in place. You can leave the end to poke out a little.

On the beak, begin felting underneath, so that it ends up sticking out straight.

Come back on top just a bit to even out the felting. When you are holding these smaller pieces in place and felting with that tool, you really should remember to be careful of the barbs. Now that you’ve come this far, it would be a shame to ruin the bird with blood stains!

And, there he is. A healthy spring chick. These birds look great even without eyes, and if you like this look, just leave him at this stage and call him a beautifully finished project.

If you want to give him that little extra personality, simply dot a bit of glue right onto the felt, press the bead into the glue and hold in place for a couple seconds. Do the same for the other eye.

After you make one and see how easy fun and easy it is, you’ll want to make a whole row of them…

…a little family, even!


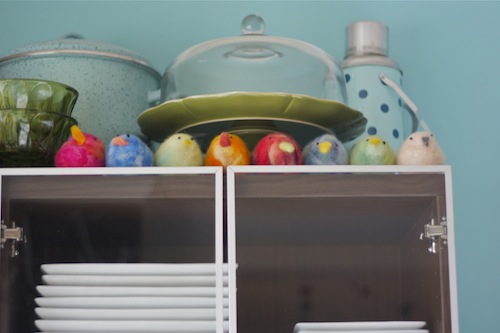
Finally, you can perch them in your home to help you enjoy the wonder of springtime.
Project by Miranda Anderson for Design Mom.